Step 1: Gather Your Supplies Before You Begin
Before you jump into making your Perfect Flower Crown, the most important thing is to have everything ready in one place. You will need floral wire, floral tape, wire cutters, scissors, and of course your fresh or artificial flowers. Some people also like to keep a ruler nearby to measure the crown’s size properly. Laying everything on a clean flat surface — like a kitchen table — makes the whole process much easier and less stressful. If you try to search for tools mid-way through, you might lose your creative momentum. Preparing everything in advance saves time and keeps you focused on the fun part, which is actually building your beautiful crown.

Step 2: Choose the Right Flowers for Your Crown
Not every flower works well in a crown, so choosing wisely makes a huge difference. Go for flowers with sturdy stems and petals that do not wilt too quickly, like roses, baby’s breath, chamomile, lavender, or small daisies. If you want your crown to last longer without wilting, artificial silk flowers are a great choice. Fresh flowers look and smell amazing but need to be used on the same day. Mix different sizes — some big blooms and some tiny ones — to create texture and visual interest. A crown with only one type of flower can look a little flat, while a mix gives it that full, lush, romantic feel everyone loves.

Step 3: Measure Your Head Correctly
Getting the right fit for your flower crown is really important, otherwise it will either fall over your eyes or sit too tight and give you a headache. Take a flexible measuring tape or even a piece of string and wrap it around your head, just above your ears and across your forehead. Note the measurement — most adults are between 21 to 23 inches. Cut your floral wire about two inches longer than this measurement on each side, because you will need extra wire to create loops at the ends so the crown can be fastened together comfortably. A properly fitted crown stays put all day without needing constant adjustment, which lets you actually enjoy wearing it.

Step 4: Create the Base Wire Frame
The wire frame is the backbone of your entire crown, so it needs to be sturdy and well-made. Use floral wire that is thick enough to hold its shape — 20 or 22 gauge wire works really well for this. Bend the wire into a circle that matches your head measurement, then twist the two ends together tightly to secure them. For extra strength, many crafters double up by wrapping a second layer of wire around the first. Once your circle is formed, bend small loops at the two ends using pliers or your fingers. These loops allow you to tie a ribbon or hook the ends together when wearing the crown. Take a moment to check the shape and make sure it is even all the way around.

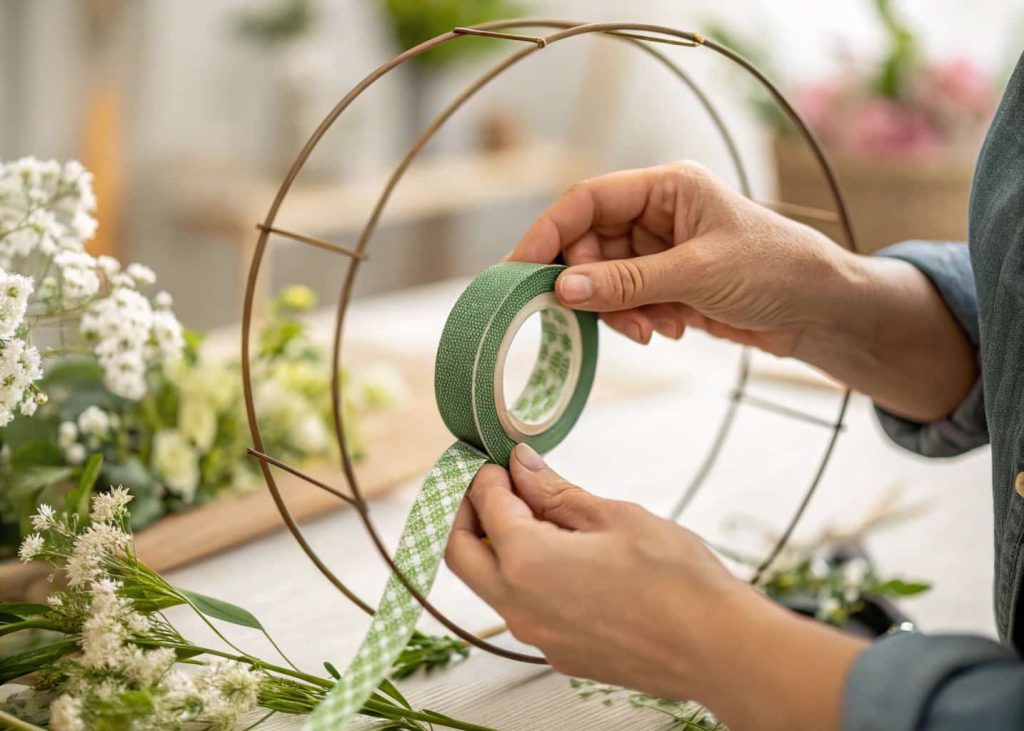
Step 5: Wrap the Frame with Floral Tape
Once your wire base is ready, wrapping it with floral tape is the next essential step. Floral tape is slightly stretchy and self-adhesive — it only sticks to itself when pulled taut, which makes it perfect for this job. Start at one end of the frame and stretch the tape as you spiral it tightly around the entire circle. Make sure there are no gaps in the tape covering. This step serves two purposes: it gives the wire a natural green look that blends with your flower stems, and it creates a slightly sticky surface that actually helps the flower bundles grip better and stay in place as you attach them. Do not rush this part — a neatly wrapped frame leads to a neater final crown.
Step 6: Trim Your Flower Stems to the Right Length
Now it is time to start preparing your flowers. Pick up each flower and trim its stem down to about one to two inches using sharp scissors or wire cutters. Longer stems are harder to attach cleanly and can poke out awkwardly, making the crown look unfinished. If you are using flowers with very thick stems, try to choose scissors or cutters strong enough to make a clean cut without crushing the stem. As you trim, group your flowers by size and type — small filler flowers like baby’s breath in one pile, medium flowers in another, and your focal blooms in a third. Working in organized groups makes the assembly process much smoother and helps you plan the layout of your crown before you commit anything to the wire frame.

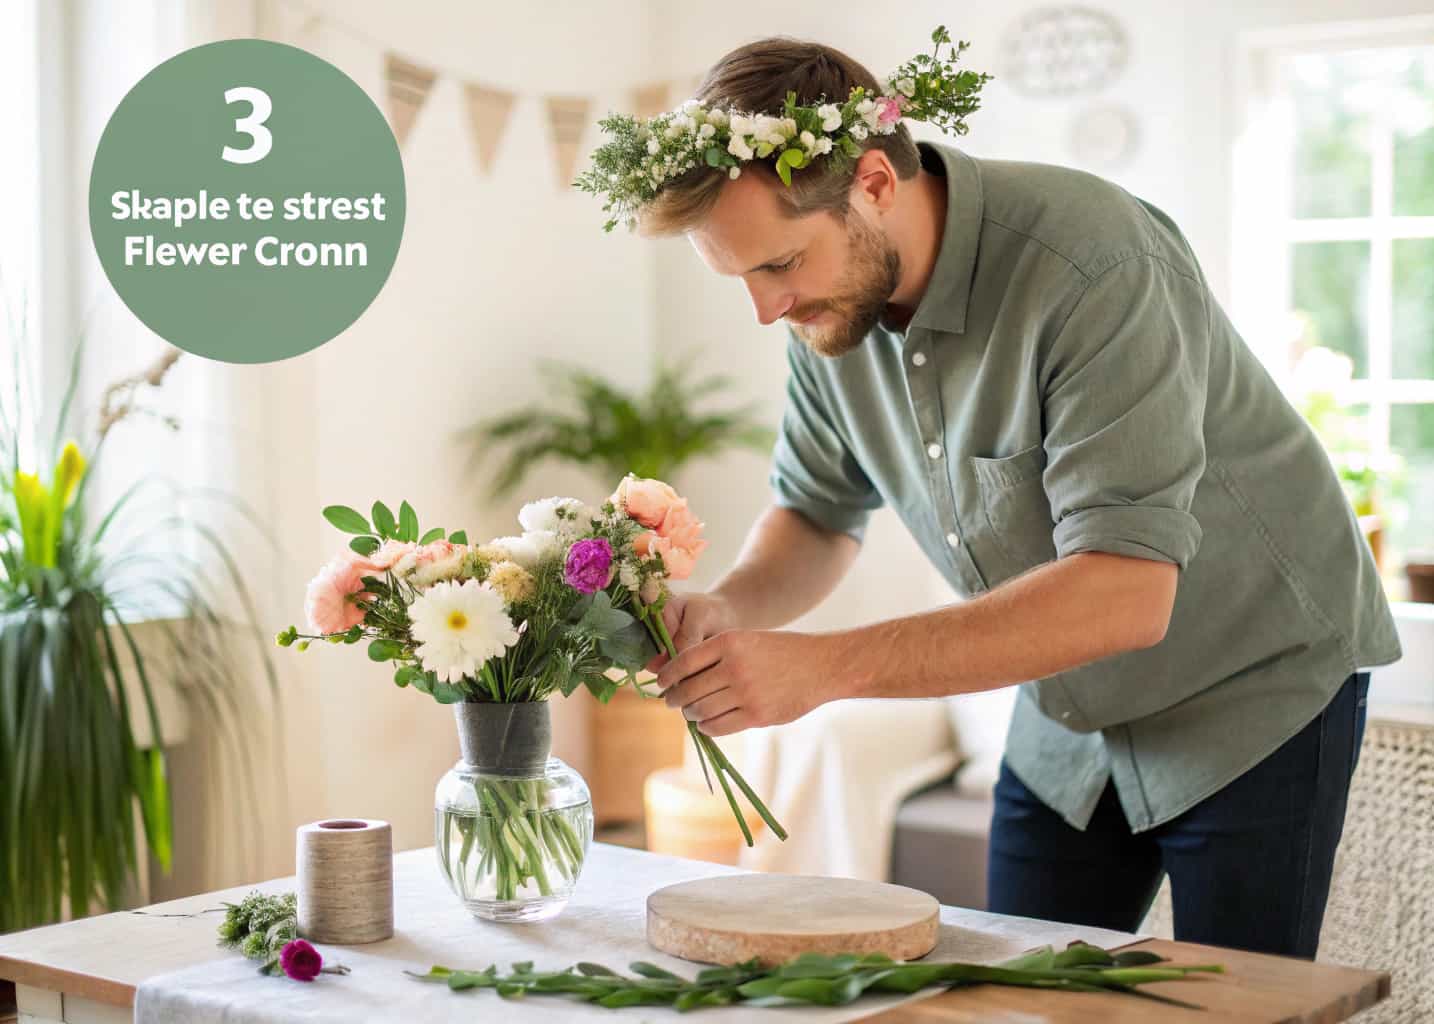
Step 7: Create Small Flower Bundles
Instead of attaching flowers one by one directly to the wire frame, creating small bundles first makes the process far more manageable. Take two to four stems — a mix of a small filler flower, a leaf or two, and a focal flower — and hold them together at the base. Wrap their stems tightly together with a short piece of floral tape, making a compact little bundle. This bundle method gives your crown a fuller, more professional look because you are adding multiple elements at once rather than sparse individual flowers. It also makes it easy to control where each cluster sits on the frame. Creating around fifteen to twenty bundles before you start attaching them gives you a good supply to work with and lets you see whether you have enough variety in your selection.

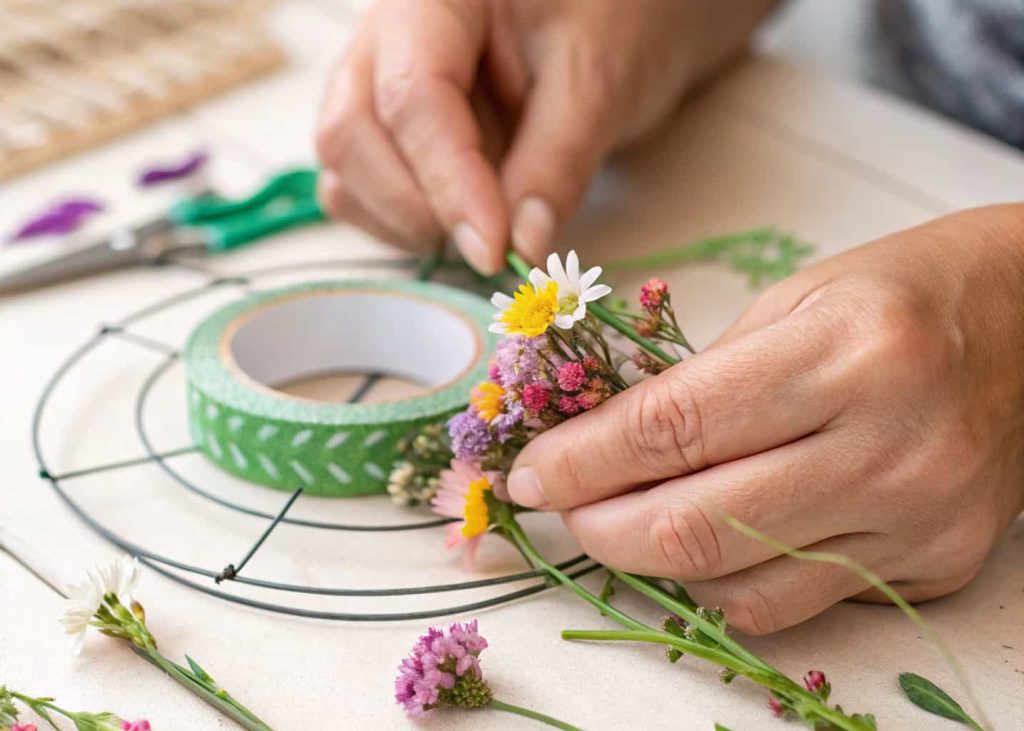
Step 8: Attach the First Bundle to the Frame
Now comes the exciting part — attaching your flower bundles to the wire crown frame. Place your first bundle at the starting point on the frame, usually the back or the side. Hold the bundle against the wire so the flower heads face outward and upward, then secure the stems tightly to the wire by wrapping floral tape around both the bundle stems and the wire together. Wind the tape firmly four or five times and then pull it along the wire to begin positioning the next bundle. Keeping tension on the tape is what keeps everything locked in place. Do not be afraid to press the bundle firmly against the wire — a loose first attachment can cause the whole crown to shift and unravel as you continue building. Confidence at this step pays off later.
Step 9: Continue Adding Bundles Around the Crown
With your first bundle secured, continue adding the rest in the same direction — always moving around the circle the same way, not changing direction. Place each new bundle so its flower heads overlap and slightly cover the stems of the previous bundle. This overlapping technique is the secret behind that lush, seamless look where you cannot see any gaps or wire between the flowers. After placing each bundle, wrap floral tape tightly around the stems and wire, continuing the tape smoothly in one unbroken spiral. As you go around the crown, keep checking the balance — try to distribute the different flower types evenly rather than clustering all the large blooms on one side. Even spacing and variety make the crown look intentional and beautiful rather than randomly assembled.

Step 10: Balance Colors and Textures As You Go
As you attach each new bundle, step back occasionally and look at the crown from a distance. This gives you a better sense of how the colors and textures are distributing across the whole piece. If you notice too many pink roses grouped together on one side, spread them out by inserting a white or purple bundle in between. Texture matters just as much as color — mixing soft petals with spiky greenery or feathery baby’s breath creates visual depth that makes the crown look expensive and thoughtfully designed. Think of it like arranging a bouquet but in a circle. There are no strict rules here, just trust your eye. If something looks off to you, it probably is — and you can usually loosen the tape and reposition before it fully dries and sets.

Step 11: Fill in Any Gaps with Small Filler Flowers
Once all your main bundles are attached and the crown is looking full, you will likely notice a few small gaps where the wire or tape is peeking through. This is completely normal and easy to fix. Use your smallest filler flowers — baby’s breath, tiny daisies, or small leaves — and tuck them into the gaps one by one. You can attach them directly with small pieces of floral tape, or if the gap is tiny, sometimes gently pressing the stem underneath an adjacent bundle stem is enough to hold it in place. Adding greenery to the gaps also serves a practical purpose — it gives the crown a natural, garden-gathered look. Leaves and small green herbs like eucalyptus are especially beautiful for filling gaps and add a lovely fresh scent to the finished crown.

Step 12: Secure the Ends and Close the Crown
After you have gone all the way around and the crown is covered in flowers, it is time to close the circle and secure the two ends together. This is where those little loops you made at the beginning of your wire frame come in handy. Bring the two ends of the crown together and connect the loops, then wrap floral tape tightly around the join point several times to reinforce it. Once the ends are closed, tuck any remaining small flowers or greenery over the join to camouflage it completely — you want the crown to look like a seamless circle with no visible starting or ending point. If the join area feels weak, cut a short extra piece of wire and twist it around the connection as additional reinforcement before covering it with tape and flowers.

Step 13: Mist Fresh Flowers to Keep Them Perky
If you have used fresh flowers in your crown, a light misting with water will help them stay fresh and vibrant for longer. Fill a small spray bottle with clean water and lightly mist the flowers from about twelve inches away. Do not soak the crown — you just want a gentle refresh, not dripping petals. After misting, place the crown in a cool spot or loosely cover it with a damp paper towel if you are not wearing it immediately. Avoid placing fresh flower crowns in direct sunlight or near heat sources as this causes wilting very quickly. If you are making the crown a day ahead, storing it in the refrigerator in a loose plastic bag works wonderfully to preserve the flowers until you are ready to wear it to your event.

Step 14: Style and Wear Your Finished Crown
Your flower crown is finished — now enjoy wearing it! Place it on your head so it sits comfortably just above your ears and rests naturally on your hairline. For a bohemian look, wear it with loose wavy hair and let a few strands fall forward around the flowers. For something more polished and elegant, pair it with a neat updo or a braided style that lets the crown take center stage. If the crown feels a little loose, you can thread a piece of ribbon through the wire loops at the back and tie it in a bow to adjust the fit. Flower crowns are not just for weddings and festivals — they are wonderful for birthday photos, garden parties, bridal showers, or simply wearing around the house on a slow Sunday morning when you want to feel a little magical.

Final Thoughts
Making a flower crown at home is one of those creative projects that looks impressive but is genuinely approachable for anyone willing to try. Once you have the basic technique down — bundles, tape, overlap, fill — you can experiment endlessly with different flowers, colors, and styles for every season and occasion. Spring calls for pastel tulips and soft pinks. Summer loves bold sunflowers and wildflowers. Autumn looks stunning with dried wheat, berries, and warm oranges. Winter crowns can shimmer with silver leaves and white blooms. The best part is that no two crowns will ever look exactly the same. Each one carries your personal touch, your color choices, your sense of beauty. Give it a try and you might just discover a new favorite creative hobby.
https://shorturl.fm/Olnhi
https://shorturl.fm/ocu0N
https://shorturl.fm/jyJof
https://shorturl.fm/8e9Vx
https://shorturl.fm/Z2WtX
https://shorturl.fm/ajDKK
https://shorturl.fm/S9Ges
https://shorturl.fm/WDz4H
https://shorturl.fm/gWgPI
https://shorturl.fm/XGqme
Как маркетинговое агентство работает с ограниченным бюджетом клиента?
Какие домашние животные не требуют ежедневных прогулок на улице?
Что реально означает продвижение сайта с гарантией — как это прописывается в договоре?
I appreciate how this post manages to keep a considered and conversational tone while still presenting the topic in a easy-to-follow and organized way, which helps make the content feel more engaging and easier for readers to connect with personally.
casino en ligne avec retrait instantane
The discussion here feels both well-considered and clear, since the post keeps a natural structure and a balanced tone that help maintain reader interest while also encouraging respectful and meaningful interaction online.
конь ебет ебак
Your writing flows very smoothly, and the transition between the different points you raised was easy to follow enough that I found myself reading through the entire post without getting distracted or losing my place even once.
Сад и огород
The way this post presents its ideas makes the discussion feel well-rounded, interesting, and relatable for a wide range of readers online.
mejor casino cuenta rut
Как измерить ROI от Гео продвижения сайта? Гео продвижение сайта
Почему домашние животные иногда пьют воду из странных мест, а не из миски?
Thank you for compiling these essential points into such an easy-to-digest format. The methodical layout combined with your completely unbiased perspective results in an outstanding piece of writing that genuinely helps the audience understand the broader context of the situation.
casino avec neosurf
solana casino club https://sol-casino-liste.de/
يمثل موقع 888starz الرسمي وجهة متكاملة للاعبين في مصر تضم الكازينو والمراهنات الرياضية معًا.
يضم كازينو 888starz أكثر من 5000 لعبة من كبار المزودين العالميين مثل Pragmatic Play و NetEnt و Microgaming.
يتيح الموقع الرسمي الرهان على ما يزيد عن 50 نوعًا رياضيًا تغطي أبرز الأحداث العالمية.
888starz https://bbhscanners.com/
يبرز 888starz أحدث البونصات والعروض الترويجية المتاحة للاعبين في مصر.
يعمل الدعم الفني على مدار الساعة باللغتين العربية والإنجليزية عبر الدردشة والبريد والهاتف.
888starz o’zbek tilidagi tushunarli interfeysga ega bo’lib, barcha bo’limlarga oson kirishni ta’minlaydi.
888starz uz https://oerknal.org/888starz-platformasida-futbol-va-kazino-boyicha-stavkalar-qanday-qoyiladi/888starz
Sayt TV o’yinlari — Keno, Wheel, Poker, Bingo — va mashhur Aviator kabi tezkor o’yinlarni ham o’z ichiga oladi.
888starz eng muhim sport tadbirlariga raqobatbardosh liniyalar bilan tikishni ta’minlaydi.
Yangi o’yinchilar birinchi depozitga +100% bonus oladi — 1500€ gacha va 150 bepul aylantirish.
Ro’yxatdan o’tish telefon raqami yoki email orqali bir necha daqiqada amalga oshiriladi.
Rasmiy sayt to’liq o’zbek tilida ishlaydi va foydalanuvchilar uchun qulay interfeysga ega.
Rasmiy saytda jonli dilerli kazino bo’limi real dilerlar bilan o’ynash imkonini beradi.
Rasmiy saytda jonli tikish koeffitsiyentlari o’yin davomida real vaqtda yangilanadi.
888starz https://archevore.com/
888starz O’zbekiston bozori uchun to’liq kazino va bukmeker xizmatlarini bir joyda jamlaydi.
888starz slotlari Evolution, Rival, Smartsoft va Spinthon kabi provayderlar tomonidan ta’minlanadi.
888starz uz 888starz uz
Sayt yirik xalqaro tadbirlar hamda mahalliy musobaqalar bo’yicha liniyalarni taklif etadi.
888UZ777 kodi to’liq xush kelibsiz paketini faollashtiradi.
888starz turli depozit usullari — bank kartasi, hamyon va kripto — bilan ishlaydi.
жилье на пхукете Решив снять квартиру на Пхукете, вы получаете максимум независимости и свободы в планировании своего распорядка дня. Это идеальный вариант для тех, кто не любит привязываться к жестким правилам отелей.
https://yu.com/ yu
https://customerscomm.com/read-blog/188673
https://www.seyhancanta.com/blog/another-blog-post
https://heylink.me/worldsxBet26/
https://www.linkedpt.com/employers/4234199-applywins26
https://www.leenkup.com/read-blog/162793
https://twanty2.com/xbetpbonus12
https://kktix.com/user/10117919
https://www.atlasobscura.com/users/xbetoffir1
https://www.atlasobscura.com/users/1xbetprocode
https://www.ufs.ac.za/transformation-of-the-professoriate-mentoring-programmme/news-and-events/events/2023/01/27/default-calendar/meeting-with-prof-petersen
аренда квартиры в паттайя снять жилье в паттайе
https://rclub.one/
https://forta100.ru/
https://culturesbook.com/1783366522999807_94748
https://кофе-принтер.рф/ Печатайте логотипы, фото и поздравления на кофейной пенке с помощью наших принтеров. Модели Evebot Fantasia Color и Evebot 2-в-1 — лидеры рынка 2026 года. Посетите “Кофе-Принтер.РФ” для оформления заявки.
https://janjaonline.mn.co/members/40472067
https://webhitlist.com/forum/topics/c-digo-promocional-1xbet-2026-1xwap-150-giros-gratis-casino
hentai porn comic
снять жилье в паттайе снять жилье в паттайе
http://qa.doujiju.com/index.php?qa=user&qa_1=1xbetprocode
https://webhitlist.com/forum/topics/online-casino-entertainment-available-around-the-clock
https://sites.gsu.edu/sanderson57/2016/09/07/my-turner-field-experience/comment-page-563/?unapproved=89107&moderation-hash=6deb7ec1b4eed9396213b6ff16481f90#comment-89107
https://www.porada.sk/
taxi service Getting a taxi in Mauritius is the most comfortable way to explore the island at your own pace. Let our professional team take you wherever you need to go.
https://www.newazmagic.simplysmartwebs.com/board/board_topic/8097541/8626578.htm
Как улучшить зрение. Постоянное использование гаджетов сильно утомляет глаза, поэтому важно знать, как улучшить зрение в условиях современного ритма жизни. Делайте регулярные перерывы и практикуйте технику частого моргания.
аренда апартаментов паттайя аренда кондо паттайя
https://www.maxwaugh.com/
https://forta100.ru/
https://www.weddingbee.com/members/1xbetpromo54/
аренда апартаментов паттайя аренда кондо паттайя
https://forta100.ru/
Как правильно начать seo продвижение молодого сайта, которому меньше 3 месяцев?
https://forta100.ru/
https://kitesurfing.by/kitesurfing/
https://controlc.com/d5zgnegz
https://blogs.umb.edu/evelynugwugeorge001/about-library-instruction-blog/comment-page-302/?unapproved=65201&moderation-hash=961f738a506fc986c4a695a6681c491d#comment-65201
https://realbusiness.co.uk/
https://linkin.bio/1xbetdown/
maorou_k8m porno
https://krematsiya-moskva.ru/
https://maker.wiznet.io/codepromo453
https://t.me/hudushin_seo Как зарабатывать больше в фитнес-бизнесе без лишних затрат. Реальные кейсы: CRM, автоматизация продаж, ИИ-инструменты, управление командой. Делюсь тем, что работает в Zaruba Fitness
https://krambride.at.ua/forum/7-7246-1
maorou_k8m порно
https://jobs.landscapeindustrycareers.org/profiles/8549649-bonus-bets
https://sardegnadelsud.com/comment-activer-un-bonus-de-casino-en-ligne-sans-manquer-les-conditions/
https://igli.me/1xbetdown
krematsiya-moskva ru
ко ланта ко ланта
Kompaniya foydalanuvchi ma’lumotlari va moliyaviy operatsiyalarni himoya qilishga katta e’tibor qaratadi.
Bonus va aksiyalar 888starz foydalanuvchilarni jalb qilishda muhim rol o’ynaydi. Bonusdan samarali foydalanish uchun uning qoidalarini diqqat bilan o’rganish kerak.
888starz https://888starz-uzb10.com/
O’yin tanlovi va provayderlar assortimenti 888starz-da keng. Demo rejim yordamida yangi o’yinlarni bepul o’rganish mumkin.
To’lovlar va mijozlarga xizmat ko’rsatish 888starz ning ustun tomonlaridan biridir. Platforma bir qator ishonchli to’lov usullarini taklif qiladi, bu esa pul operatsiyalarini soddalashtiradi.
Ro’yxatdan o’tganlarga maxsus takliflar taqdim etilishi odatiy hol.
888starz. com https://888-uz3.com/
يقدم الموقع تصميمًا عربيًا واضحًا وقائمة تدعم أكثر من خمسين لغة.
تنفرد سلسلة 888Games بألعاب سريعة مثل Crash و Dice و Plinko و Lottery.
يقدم 888starz مراهنات على عشرات الرياضات بينها الإي سبورتس مثل Dota 2 و CS:GO.
ينال المراهن الرياضي بونص ترحيب 100% بحد أقصى 100 يورو.
يقدم 888starz خدمة 24/7 بالعربية إلى جانب تطبيق محمول لأندرويد وآيفون.
888 starz 888stars
888starz.bet mobil ilovasi foydalanuvchiga saytning barcha imkoniyatlarini telefon orqali ochib beradi.
Android apk faylni ochishdan avval tashqi manbalarga ruxsatni yoqishni talab qiladi.
Dastur hatto o’rtacha quvvatli qurilmalarda ham uzilishlarsiz ishlaydi.
Mobil platforma Bittech B.V. litsenziyasi ostida xavfsiz o’yin muhitini ta’minlaydi.
Android bilan bir qatorda 888starz iOS foydalanuvchilari uchun ham mavjud, mobil versiya esa PWA sifatida ochiladi.
8888 starz skachat https://6thavechurch.org/
يتوفر الموقع بأكثر من خمسين لغة ويقدم واجهة عربية واضحة وسهلة الاستخدام.
يوفر الكازينو الحي أكثر من 250 طاولة مع موزعين حقيقيين تعمل على مدار الساعة.
يتيح الموقع الرهان الحي مع متابعة النتائج والاحتمالات لحظة بلحظة.
يمنح 888starz للمراهنين الرياضيين بونص أول إيداع 100% حتى 100 يورو.
يدعم الموقع البطاقات البنكية والمحافظ مثل Skrill و Neteller إضافة إلى أكثر من 50 عملة مشفرة.
http://malehu.coffee/2026/06/27/888starz-%d9%83%d8%a7%d8%b2%d9%8a%d9%86%d9%88-%d9%85%d8%a8%d8%a7%d8%b4%d8%b1-%d9%88%d8%b1%d9%87%d8%a7%d9%86-%d8%b1%d9%8a%d8%a7%d8%b6%d9%8a-%d9%85%d9%88%d8%ab%d9%88%d9%82/ https://ngageonline.com/member-login?login=invalid_username
заказать упаковку Стильная упаковка для чая способна значительно повысить узнаваемость вашего продукта в розничных сетях. Мы предлагаем разработку дизайна, который будет притягивать взгляды.
https://awan.pro/forum/user/194726/
888starz.bet kazino va sport tikishlarini yagona rasmiy resursda birlashtirib, o’zbek foydalanuvchilariga to’liq xizmatni taqdim etadi.
888Games to’plamida Crash, Dice va Plinko kabi ommabop tez o’yinlar mavjud.
888starz eng muhim sport tadbirlarini raqobatbardosh koeffitsiyentlar bilan qamrab oladi.
Kazino uchun yangi o’yinchilar birinchi depozitga 1500€ gacha bonus va 150 bepul aylantirish oladi.
888starzda akkaunt bir necha oddiy qadamda yaratiladi, kirish depoziti past.
888starz betting https://888starz-uzb5.com/
https://krematsiya-moskva.ru/
تتوفر المنصة بعشرات اللغات مع تصميم عربي بسيط يناسب المستخدم المصري.
يقدم 888starz أكثر من أربعة آلاف عنوان سلوت متجدد باستمرار.
888stars starz888
يقدم 888starz تغطية واسعة للدوريات الأوروبية والمنافسات المحلية.
كما تتوالى العروض الدورية من كاش باك ورهانات مجانية وبطولات.
يعمل فريق المساعدة طوال اليوم، ويتوفر تطبيق محمول لأجهزة أندرويد وآبل.
https://krematsiya-moskva.ru/
888stars 888stars
يشتغل 888starz برخصة دولية من Curaçao عبر Bittech B.V. تحمي حساب اللاعب ومعاملاته.
تشمل غرف الكازينو الحي 250 طاولة وأكثر للروليت والبكارات والبلاك جاك.
يمكن المراهنة على مباريات عالمية ومحلية من كأس العالم إلى بطولات مصر.
ويحصل المراهن الرياضي على مكافأة 100% حتى 100 يورو عند أول إيداع.
تشمل وسائل الدفع الفيات والعملات المشفرة بحد إيداع يبدأ من 2 يورو.
заказать упаковку Качественные пакеты для кофе позволяют сохранить обжарку в идеальном состоянии на протяжении нескольких месяцев. Мы используем только проверенные многослойные материалы.
https://www.tapatalk.com/groups/lovinworld/viewtopic.php?f=71&t=16531&from_new_topic=1
https://allaboutschool.activeboard.com/t73028874/les-promotions-les-plus-attractives-avec-un-code-promo-bonus/?page=1#lastPostAnchor
https://circleten.org/a/425219?postTypeId=whatsNew
تخضع المنصة لرقابة ترخيص دولي يوفر بيئة لعب آمنة وشفافة.
يتيح الموقع أكثر من مئتين وخمسين طاولة روليت وبلاك جاك مباشرة في أي وقت.
يقدم الموقع مراهنة فورية وإحصاءات مباشرة على المباريات الجارية.
ينتظر اللاعبين النشطين برنامج عروض أسبوعي غني بالكاش باك والجوائز.
تتنوع وسائل الدفع بين الفيات والعملات الرقمية بحد أدنى يبدأ من 2 يورو.
888 stars 888 stars
https://www.gweb.com/author/cdigosxbet/
https://medium.com/@latest-news-hub/1win-casino-promo-code-1win2026vip-500-free-spins-0263f30baee2
оборудование для фасовки кофе Пакеты восьмишовные создают премиальный облик продукта, который выделяется на полке среди конкурентов. Инвестируйте в визуальное качество вашего товара.
https://doks.komun.org/s/d05vJF78XI
оклейка плёнкой Спектрол Премиум Качественная оклейка плёнкой Spectroll продлевает жизнь заводскому лаку. Мы предлагаем комплексные решения по защите кузова.
https://fanclove.jp/profile/K4JGnqRj28
https://docs.google.com/forms/d/e/1FAIpQLSexkw9mHXvw3ja4xsqViO_pLrn-mEU63OsAreDG7562ej8N5g/viewform?usp=header
Купить кайт Cabrinha Switchblade Минск
https://nl.pinterest.com/pin/1059964462325437486/
https://app.talkshoe.com/show/promo-code-for-1xbet-today-thailand
https://infodrips.com/sympathy-online-betting-opportunities-risks-and-regulations/
оклейка плёнкой Спектрол Премиум Спектрол Премиум обеспечивает максимальный блеск и долгосрочную защиту кузова. Материал устойчив к растяжениям и высоким температурам.
888starz Curacao rasmiy litsenziyasiga tayanadi, bu foydalanuvchi mablag’lari va ma’lumotlari himoyasini ta’minlaydi.
888starz 250 dan ortiq jonli dilerli stolni istalgan vaqtda ochiq tutadi.
Real vaqt rejimi yuqori koeffitsiyent va tezkor yangilanish bilan ishlaydi.
Sport tikishlari uchun alohida 100% bonus 100€ gacha taklif etiladi.
888starz karta va hamyonlardan tashqari BTC, USDT va ETH kabi kripto to’lovlar bilan ishlaydi.
88star https://888starz-uzb7.com/
Купить кайт Cabrinha Switchblade Минск
https://app.talkshoe.com/user/xbetbonus337
https://www.slideshare.net/letgobet26?tab=about
Spectroll Premium Нанесите Спектрол Премиум, чтобы забыть о мелких царапинах на кузове. Это покрытие восстанавливается под воздействием тепла.
https://homedeco.nl/profile/digeyo7299/binnenkijkers/
полиуретановая пленка spectroll С пленкой Spectroll ваш автомобиль всегда выглядит безупречно и защищенно. Это правильное решение для сохранения стоимости автомобиля.
3d dino game Play the Google Dinosaur Game online — no offline mode needed! Jump over cacti, dodge pterodactyls and beat your high score with the classic Chrome T-Rex Runner. Free, fast, works on any device.
трансы воронеж
Купить кайт Cabrinha Switchblade Минск
dino game unblocked Play the Google Dinosaur Game online — no offline mode needed! Jump over cacti, dodge pterodactyls and beat your high score with the classic Chrome T-Rex Runner. Free, fast, works on any device.
трансы Челябинск
Купить кайт Cabrinha Switchblade Минск
NanoVNA калибровка ExpressLRS Packet Rate — это гибкий параметр, который делает систему универсальной. Одна и та же аппаратура подходит и для парка, и для гор.
https://molo4nica.in.ua/
качество связи ELRS Как понять связь FPV: ориентируйтесь на стабильность значений LQ и отсутствие предупреждений на экране. Это лучший индикатор исправности системы.
https://www.gilmaire-etienne.com/
https://molo4nica.in.ua/
прошивка FPV приемника Как прошить приемник ELRS: это можно сделать через Wi-Fi или с помощью специального USB-адаптера. Самый удобный способ — использовать беспроводное обновление.
как настроить VTX Table Настройка ELRS для новичка — это выбор стандартной частоты 2.4 ГГц и установка стабильной прошивки. Не старайтесь сразу менять сложные параметры.
Butun interfeys o’zbek tilida ishlab, 50 dan ortiq til qo’llab-quvvatlanadi.
бк 888starz бк 888starz
888starz saytida 4000+ slot muntazam kengayib boruvchi kutubxonada joylashgan.
Foydalanuvchilar yirik xalqaro turnirlar va mahalliy chempionatlarga stavka qo’yishlari mumkin.
Bundan tashqari saytda keshbek, freebet va slot turnirlari muntazam o’tkaziladi.
Hisob ochish telefon yoki email orqali bir necha daqiqada amalga oshadi.
888starz Curacao rasmiy litsenziyasi asosida ishlab, o’yinchi hisobini va pulini himoya qiladi.
Jonli kazinoda real dilerli 250 dan ortiq stol sutka bo’yi ochiq turadi.
Jonli tikishda koeffitsiyentlar o’yin borishiga qarab real vaqtda yangilanadi.
Kazino uchun yangi o’yinchi ilk depozitga 1500€ gacha bonus va 150 bepul aylantirish oladi.
Hisob ochish telefon yoki email orqali bir necha daqiqada amalga oshadi.
888straz 888straz
https://angersnautique.org/
888staz 888staz
888starz.bet O’zbekiston bozori uchun to’liq kazino va sport tikish xizmatlarini yagona saytda ochib beradi.
888starz ikki yuz ellikdan ziyod jonli dilerli ruletka va bakara stolini taqdim etadi.
888starz o’ttiz beshdan ziyod sport turiga tikishni, jumladan Dota 2 va CS:GO kibersportini taklif etadi.
888starz doimiy aksiyalar, keshbek va slot musobaqalari bilan o’yinchilarni rag’batlantiradi.
To’lovlar Visa, Mastercard, Skrill va 50 dan ortiq kriptovalyuta orqali amalga oshiriladi.
يستمد 888starz مصداقيته من رخصة Curaçao الرسمية عبر Bittech B.V. التي تحمي أموال اللاعب وبياناته.
أما عشاق الأجواء الحقيقية فينتظرهم كازينو حي بأكثر من 250 طاولة يديرها موزعون فعليون.
يغطي 888starz أكثر من خمس وثلاثين رياضة بينها Dota 2 و CS:GO ضمن قسم الإي سبورتس.
ينال لاعبو الرهان الرياضي عرضًا بنسبة 100% يبلغ 100 يورو.
يعمل فريق المساعدة طوال اليوم ويتوفر تطبيق محمول لأجهزة أندرويد وآبل.
https://salestracker.realitytraining.com/node/34727 https://salestracker.realitytraining.com/node/34727.
ко ланта ко ланта
888starz 888starz
بترخيصه الدولي من كوراساو، يوفر الموقع بيئة لعب آمنة وشفافة لكل مستخدم.
يمنح 888starz لاعبيه أكثر من 250 طاولة حية بموزعين حقيقيين في أي وقت.
على صعيد الرياضة، يفتح الموقع الرهان على أكثر من 35 نوعًا من كرة القدم إلى UFC والإي سبورتس.
يمنح 888starz أول إيداع في الكازينو بونصًا حتى 1500 يورو و150 دورة مجانية.
ولا يستغرق فتح حساب جديد سوى دقائق عبر الهاتف أو البريد الإلكتروني.
https://glassrus.ae/dlyl-ttbyq-888starz-w1xbet-aal-lmwbyl-llmstkhdmyn-fy-msr/ https://test.arslogistic.ae/kyfy-lthqq-mn-hsbk-fy-mwqaa-8888-website-llmsryyn/
يحظى الموقع بترخيص كوراساو الممنوح لشركة Bittech B.V. الذي يكفل نزاهة اللعب.
يقدم الكازينو الحي أكثر من 250 طاولة بموزعين حقيقيين تعمل بلا انقطاع.
تتغير الأودز في الوقت الفعلي مع خيار المراهنة الحية ومتابعة النتائج.
تبلغ باقة الترحيب في الكازينو 1500 يورو إضافة إلى 150 فري سبين.
لا يتطلب إنشاء الحساب سوى دقائق معدودة على الموقع الرسمي.
https://ledigital.com/wp-content/
888starz 888starz
تعمل المنصة برخصة كوراساو تديرها Bittech B.V.، مما يضمن نزاهة اللعب وسلامة الأموال.
ينفرد الموقع بمجموعة 888Games الخاصة ذات النتائج السريعة.
يوفر الموقع رهانًا فوريًا وإحصاءات مباشرة على المباريات الجارية.
يستقبل الكازينو اللاعب الجديد بمكافأة تصل إلى 1500 يورو مع 150 لفة مجانية.
ويبقى الدعم متاحًا 24/7 عبر الدردشة والبريد مع تطبيق لأندرويد و iOS.
https://t.me/KohLantaKrabiThailand ко ланта
https://angersnautique.org/
L’atmosfera da show e le vincite potenziali attirano un vasto pubblico in Italia.
Il giocatore sceglie liberamente su quali caselle distribuire la propria puntata.
In Pachinko una pallina cade lungo un tabellone di pioli assegnando il moltiplicatore in cui atterra.
I moltiplicatori combinati possono spingere la vincita fino a 25.000 volte la posta.
Il gioco è riservato ai maggiorenni e va praticato con consapevolezza.
free chip casino free chip casino
https://ledigital.com/wp-content/
يمنح 888starz.bet مستخدمي القاهرة بوابة موحّدة تضم آلاف الألعاب وعشرات الرياضات.
يجد اللاعب في 888Games عناوين لا تتوفر لدى غير 888starz.
كازينو 888 تسجيل الدخول كازينو 888 تسجيل الدخول
يمنح الرهان المباشر احتمالات محدّثة لحظيًا أثناء المباريات.
يطرح 888starz مكافآت منتظمة تشمل الاسترداد النقدي والترقيات.
يعمل فريق المساعدة طوال اليوم مع تطبيق محمول لأندرويد وآبل.
يستند 888starz إلى رخصة Curaçao رسمية عبر Bittech B.V. تحمي حساب اللاعب وبياناته.
888starz 888starz
يبرز الموقع مجموعة 888Games الخاصة ذات النتائج السريعة والإثارة العالية.
يمنح الرهان المباشر احتمالات محدّثة لحظيًا أثناء المباريات.
تبلغ باقة الترحيب في الكازينو 1500 يورو إضافة إلى 150 فري سبين.
يمكن فتح حساب جديد عبر الهاتف أو البريد في دقائق قليلة.
Zestawienie najlepszych kasyn ułatwia porównanie bonusów, gier i warunków w jednym miejscu.
Dobre kasyno gwarantuje bezpieczeństwo transakcji dzięki nowoczesnym zabezpieczeniom.
Tryb demonstracyjny umożliwia poznanie gier bez ryzyka finansowego.
najlepsze polskie kasyna online najlepsze polskie kasyna online
Dobre kasyna oferują też stałe promocje, cashback oraz programy lojalnościowe.
Obsługa klienta dostępna całą dobę to ważny element wysokiej jakości serwisu.
Wpisanie kodu zwiększa pakiet powitalny o dodatkowe środki lub free spiny.
Kod należy wprowadzić w dedykowanym miejscu, aby bonus został poprawnie naliczony.
Promocja powiązana z kodem obowiązuje przez ograniczony okres.
Najnowsze kody warto sprawdzać przed rejestracją, aby wybrać najlepszą ofertę.
Dział wsparcia odpowiada na pytania dotyczące kodów promocyjnych przez czat i e-mail.
vox casino kod promocyjny bez depozytu vox casino kod promocyjny bez depozytu
серверная инфраструктура HSTQ серверная инфраструктура HSTQ
Darmowe spiny są chętnie wybierane, bo dają szansę na realne wygrane bez dodatkowego ryzyka.
Pierwszym krokiem jest rejestracja konta oraz weryfikacja profilu gracza.
Wygrane z darmowych spinów podlegają wymaganiom obrotu, które trzeba spełnić przed wypłatą.
Program lojalnościowy pozwala wymieniać punkty na darmowe obroty.
Każda promocja ma własne zasady, dlatego należy sprawdzić szczegóły przed grą.
mostbet 50 free spins 2026 mostbet 50 free spins 2026
VPS в Европе виртуальный хостинг HSTQ
https://www.gilmaire-etienne.com/
выделенные серверы HSTQ IP-подсети
viagra and energy drink
HSTQ Hosting аренда выделенного сервера
продление ВНЖ Испании ВНЖ Испании — это ваш официальный статус резидента, открывающий доступ к жизни в европейском государстве с высоким качеством услуг и мягким климатом. Данный документ позволяет легально проживать в стране, путешествовать по зоне Шенгена и пользоваться всеми социальными благами.
стоимость ВНЖ Испании Понимание культурных особенностей Испании поможет вам быстрее влиться в местное общество после переезда. Знание испанского языка на базовом уровне — это не только требование для некоторых типов виз, но и ключ к комфортной социальной жизни.
как понять женщину Пережить расставание помогает проживание всех этапов боли, от отрицания до полного принятия. Не пытайтесь подавлять эмоции, дайте себе время на восстановление и заботу.
empadronamiento Испания Достаточный доход — главное требование для большинства типов ВНЖ Испании. Мы проведем аудит ваших документов и оценим готовность к подаче заявки.
переезд в Испанию для россиян Гражданство Испании — вершина миграционного процесса, предоставляющая право голоса и неограниченное трудоустройство. Путь к нему долог, но результаты стоят потраченных усилий.
ревность Психология семьи изучает, как традиции и семейные сценарии влияют на поведение пары. Изучение этих истоков помогает освободиться от негативных моделей прошлого.
аренда IP-адресов виртуальный хостинг HSTQ
аренда IP-адресов hstq.net
психология семьи Семейная психология рассматривает семью как динамическую структуру, проходящую через множество этапов адаптации и развития. Понимание этих циклов помогает парам легче переносить переломные моменты, такие как рождение детей или кризисы среднего возраста.
аренда IPv4 HSTQ виртуальный хостинг HSTQ
true fortune casino true fortune casino
True Fortune Casino aims to deliver a complete online gaming experience for players in the UK and beyond.
The game library features a large selection of online slots from established software providers.
Recurring promotions add extra value for returning customers.
Secure logins and data protection are standard across the platform.
Customer support is available through live chat and email to assist players.
как общаться без ссор Ревность — это чувство, которое сигнализирует о глубинной неуверенности в себе или страхе потери контроля над ситуацией. Анализируя причины своей ревности, вы получаете доступ к своим истинным слабостям, требующим внимания и проработки.
The game runs on five reels and twenty fixed paylines that pay from left to right.
The flaming seven sits at the top of the paytable and pays the most.
super hot 20 super hot 20
Its higher variance rewards patience with occasional larger payouts.
The biggest payouts come from full lines of sevens combined with the jackpot feature.
The game features in the EGT libraries of numerous casinos and social platforms serving UK and US audiences.
серверная инфраструктура HSTQ администрирование серверов HSTQ
يمنح 888starz لاعبي القاهرة منصة رسمية واحدة تجمع الكازينو والرهانات الرياضية معًا.
يعمل الكازينو الحي بأكثر من 250 طاولة بموزعين حقيقيين على مدار الساعة.
888starz 888starz
يمنح الرهان المباشر احتمالات محدّثة لحظيًا أثناء المباريات.
يتوفر للاعبي الرياضة عرض بنسبة 100% يبلغ 100 يورو.
يقدم 888starz تسجيلًا سريعًا بخطوات بسيطة وحد إيداع منخفض.
17ХНГТ ЭИ814 17ХНГТ ЭИ814
https://almirwell.ru/о-методике/
https://bizarrevideotube.com/2026/07/07/1%d1%85%d0%b1%d0%b5%d1%82-%d0%bf%d1%80%d0%be%d0%bc%d0%be%d0%ba%d0%be%d0%b4-2026-%d1%81%d0%bf%d0%be%d1%80%d1%82-%d0%b1%d0%be%d0%bd%d1%83%d1%81-32500-%d1%80%d1%83%d0%b1-%d0%b8%d0%bb%d0%b8-130-usd/
https://gravatar.com/1xbetpromo9
https://www.simplexthailand.com/forum/topic/45522/888pinasscom
https://blender.community/vip96/
El sitio opera bajo licencia de Curaçao gestionada por Bittech B.V., lo que garantiza un juego justo y la seguridad de los fondos.
Las salas en vivo funcionan con más de 250 mesas gestionadas por crupieres reales en cualquier momento.
Las apuestas en directo actualizan las cuotas en tiempo real durante los partidos.
888Starz Site 888Starz Site
Los apostantes deportivos disponen de una oferta del 100% hasta 100 euros.
Crear una cuenta nueva requiere apenas unos minutos en el sitio oficial.
https://almirwell.ru/о-методике/
https://fortunetelleroracle.com/profile/maxwaughcom
https://alko-city.top/
https://almirwell.ru/о-методике/
https://www.investagrams.com/Profile/alemra4589590
https://xn—-itbblhvdkjdur.xn--p1ai/ Кофе Принтер — устройства для печати любых изображений (в том числе фотографий гостей кофеен и ресторанов) на кофейной пенке, пивной пенке, коктейлях, мороженом, чизкейках и других кондитерских изделиях. В 2026 году линейка представлена двумя моделями: Evebot Fantasia Color и Evebot 2-в-1. “Кофе-Принтер.РФ”
https://almirwell.ru/о-методике/
https://xn—-itbblhvdkjdur.xn--p1ai/ Кофе Принтер — устройства для печати любых изображений (в том числе фотографий гостей кофеен и ресторанов) на кофейной пенке, пивной пенке, коктейлях, мороженом, чизкейках и других кондитерских изделиях. В 2026 году линейка представлена двумя моделями: Evebot Fantasia Color и Evebot 2-в-1. “Кофе-Принтер.РФ”
https://www.ixawiki.com/link.php?url=https://clubcoma.org/blog/melbet_promo_code_58.html
https://berry.work/read-blog/83555_code-promo-1xbet-casino-2026-1x200new-bonus-130.html
https://xn—-itbblhvdkjdur.xn--p1ai/ Кофе Принтер — устройства для печати любых изображений (в том числе фотографий гостей кофеен и ресторанов) на кофейной пенке, пивной пенке, коктейлях, мороженом, чизкейках и других кондитерских изделиях. В 2026 году линейка представлена двумя моделями: Evebot Fantasia Color и Evebot 2-в-1. “Кофе-Принтер.РФ”
https://flowpaper.com/shared/8f730884/1xBetpdf6/
https://xn—-itbblhvdkjdur.xn--p1ai/ Кофе Принтер — устройства для печати любых изображений (в том числе фотографий гостей кофеен и ресторанов) на кофейной пенке, пивной пенке, коктейлях, мороженом, чизкейках и других кондитерских изделиях. В 2026 году линейка представлена двумя моделями: Evebot Fantasia Color и Evebot 2-в-1. “Кофе-Принтер.РФ”
https://alko-city.top/
https://promovalide.nizarblog.com/42458126/comment-activer-un-code-bonus-actif-et-obtenir-un-boost-de-pari
https://xn—-itbblhvdkjdur.xn--p1ai/ Кофе Принтер — устройства для печати любых изображений (в том числе фотографий гостей кофеен и ресторанов) на кофейной пенке, пивной пенке, коктейлях, мороженом, чизкейках и других кондитерских изделиях. В 2026 году линейка представлена двумя моделями: Evebot Fantasia Color и Evebot 2-в-1. “Кофе-Принтер.РФ”
https://freeicons.io/profile/953888
تعمل المنصة برخصة كوراساو تديرها Bittech B.V.، مما يضمن نزاهة اللعب وسلامة الأموال.
يجد اللاعب في 888Games عناوين لا تتوفر خارج منصة 888starz.
يقدم 888starz تغطية للدوريات الأوروبية والمنافسات المصرية.
يمنح 888starz أول إيداع في الكازينو ما يصل إلى 1500 يورو و150 دورة مجانية.
يقدم الموقع خدمة عملاء على مدار الساعة بالعربية إضافة إلى تطبيق apk ونسخة آيفون.
888starz 888starz
https://xn—-itbblhvdkjdur.xn--p1ai/ Кофе Принтер — устройства для печати любых изображений (в том числе фотографий гостей кофеен и ресторанов) на кофейной пенке, пивной пенке, коктейлях, мороженом, чизкейках и других кондитерских изделиях. В 2026 году линейка представлена двумя моделями: Evebot Fantasia Color и Evebot 2-в-1. “Кофе-Принтер.РФ”
https://alko-city.top/
https://alko-city.top/
يقدم 888starz.bet لمستخدمي مصر خدمة متكاملة تضم آلاف الألعاب وعشرات الرياضات.
يوفر الكازينو الحي أكثر من 250 طاولة بموزعين حقيقيين تعمل بلا توقف.
888 starz 888 starz
يتيح 888starz الرهان على عشرات الرياضات بينها UFC و Dota 2 و CS:GO.
يطرح 888starz مكافآت منتظمة تشمل الاسترداد النقدي والترقيات.
تتنوع وسائل الدفع بين الفيات والعملات المشفرة بحد أدنى يبدأ من 2 يورو.
Oferta z kodem skierowana jest głównie do osób zakładających konto po raz pierwszy.
Aby wykorzystać kod, należy założyć konto w Vox Casino i przejść proces rejestracji.
Kod należy wykorzystać w wyznaczonym czasie, zanim oferta wygaśnie.
Najnowsze kody warto sprawdzać przed rejestracją, aby wybrać najlepszą ofertę.
W razie problemów z aktywacją kodu pomaga obsługa klienta dostępna całą dobę.
vox casino darmowe kody bez depozytu 2026 vox casino darmowe kody bez depozytu 2026
starz888 starz888
يحمل الموقع ترخيص كوراساو المُشغَّل من Bittech B.V. الذي يكفل نزاهة النتائج.
تعمل الطاولات الحية بأكثر من 250 وحدة بموزعين فعليين بلا انقطاع.
يقدم 888starz تغطية تمتد من مباريات القاهرة المحلية إلى الأحداث العالمية.
يطرح 888starz مكافآت دورية من الاسترداد النقدي إلى الترقيات الموسمية.
يقدم الموقع خدمة عملاء على مدار الساعة بالعربية إضافة إلى تطبيق apk ونسخة آيفون.
888starz ellikdan ziyod tilda ishlaydi va sodda o’zbekcha menyu bilan har qanday foydalanuvchiga mos keladi.
Jonli kazino bo’limida 250+ real dilerli stol yigirma to’rt soat ochiq turadi.
Real vaqt rejimidagi tikish yuqori koeffitsiyent va tezkor yangilanish bilan ishlaydi.
888starz doimiy aksiyalar, keshbek va slot musobaqalari bilan o’yinchilarni rag’batlantiradi.
888starz hisobini yaratish bir necha oddiy qadamda va past minimal depozit bilan bajariladi.
888starz скачать на андроид бесплатно 888starz скачать на андроид бесплатно
تعمل المنصة برخصة كوراساو الصادرة لشركة Bittech B.V. التي تضمن نزاهة اللعب.
888 starz 888 starz
يجد اللاعب في 888Games عناوين لا تتوفر خارج منصة 888starz.
يمكن الرهان على أحداث من دوري الأبطال إلى مباريات مصر.
يحصل اللاعب الجديد في الكازينو على مكافأة تصل إلى 1500 يورو مع 150 لفة مجانية.
يبقى الدعم متاحًا 24/7 عبر الدردشة والبريد مع تطبيق لأندرويد و iOS.
يتيح 888starz للاعبين في مصر منصة رسمية تجمع الكازينو والرهانات الرياضية في موقع واحد.
888starz 888starz
يتيح الموقع أكثر من مئتين وخمسين طاولة روليت وبلاك جاك مباشرة.
يغطي القسم الرياضي أكثر من 35 نوعًا من كرة القدم والتنس إلى الهوكي والإي سبورتس.
تبلغ باقة الترحيب في الكازينو 1500 يورو إضافة إلى 150 فري سبين.
يعمل فريق المساعدة طوال اليوم مع تطبيق محمول لأندرويد وآبل.
صُمم قسم الكازينو ليكون سهل التصفح مع بحث سريع عن العناوين.
يوفر الوضع التجريبي فرصة للتعرف على آلية اللعبة قبل الإيداع.
يضم الكازينو الحي أكثر من 250 طاولة يديرها موزعون حقيقيون على مدار الساعة.
تقدم أقسام TV Games تجارب خفيفة بجولات قصيرة.
يمكن الإيداع والسحب عبر Visa و Mastercard و Skrill والكريبتو.
888stars 888stars
starz 888 starz 888
يوحّد 888starz تجربة الكازينو والمراهنات الرياضية أمام المستخدم في القاهرة.
يتوفر في الكازينو الحي أكثر من 250 طاولة بموزعين حقيقيين تعمل بلا توقف.
يشمل الموقع أكثر من 35 فئة رياضية تتابع كبرى الأحداث في العالم.
يمنح الكازينو أول إيداع بونصًا يصل إلى 1500 يورو و150 دورة مجانية.
يدعم الموقع البطاقات والمحافظ إضافة إلى أكثر من 50 عملة رقمية بينها BTC و USDT و ETH.
يستند 888starz إلى رخصة Curaçao رسمية تكفل عدالة اللعب وحماية الأرصدة.
888stars 888stars
يحتوي الكازينو على آلاف ماكينات السلوت من استوديوهات مرموقة.
يمكن للاعبين خوض جولات روليت وبلاك جاك بجودة بث عالية.
يقدم 888starz ألعاب 888Games الخاصة بنتائج فورية وإثارة عالية.
تبلغ باقة الترحيب في الكازينو 1500 يورو إضافة إلى 150 فري سبين.
يقدم 888starz قائمة معرّبة واضحة تناسب المستخدم القاهري.
starz 888 starz 888
يقدم 888starz سلسلة 888Games الخاصة بتجارب سريعة ونتائج لحظية.
يفتح 888starz الرهان على عشرات الرياضات بما فيها UFC و Dota 2 و CS:GO.
تصل باقة الترحيب في الكازينو إلى 1500 يورو إضافة إلى 150 فري سبين.
تشمل وسائل الدفع الفيات والعملات المشفرة بحد إيداع يبدأ من 2 يورو.
يفتح 888starz أمام لاعبي مصر بوابة واحدة للكازينو والمراهنات الرياضية.
يضم القسم آلاف ألعاب السلوت من استوديوهات موثوقة.
888starz 888starz
يوفر الموقع رهانًا فوريًا وإحصاءات مباشرة للأحداث الجارية.
ينال المراهن الرياضي بونص أول إيداع بنسبة 100% حتى 100 يورو.
يبقى الدعم متاحًا 24/7 عبر الدردشة والبريد مع تطبيق لأندرويد و iOS.
https://www.warealtor.org/home/professionalism-part-5-multiple-offers-from-the-same-buyer
https://mike-wiki.win/index.php/Latest_1Win_Promo:_1WIN2026VIP_-_%2B500%25_Package
https://www.cyberpinoy.net/tylersands2026
https://rentry.co/mf3yv426
https://www.start-bookmarks.win/1xbet-registration-promo-code-1xbono200-130-bonus
https://slubowisko.pl/topic/123163/
https://bookmark-template.com/story29559947/bonus-de-tours-gratuits
https://velog.io/@melbetofthebest1/about
https://coffeetimemadrid.com/hello-world#comment-32642
https://rant.li/13h412k3qi
https://www.horticulturaljobs.com/jobs/c50aeed9-d354-4d15-8d56-f945d4f13291/preview?c=7c6d6cf3-eff4-4024-a646-c122afba195c
https://dptz.theweb.place/user/amaristxes
https://www.adpost.com/u/maureenjul747martinez7732/
https://www.simplexthailand.com/forum/topic/42941/code-promo-melbet-2026-:-new888-%7C-%E2%82%AC130-offre
https://hedgedoc.schule.social/s/0pzz0Glv-0
http://okprint.kz/user/cwrictralc
https://www.1001fonts.com/users/winrush88/
https://source-wiki.win/index.php/1xBet_Mobile_App_2026:_Smart_Guide_to_Betting,_Live_Games,_and_Secure_Access_24168
https://blender.community/1xbetpromocode5/
https://www.question2answer.org/qa/user/lindegaard48josefsen
https://ontrip.80gigs.com/profile/hoffman83steenberg/
https://hackmd.openmole.org/s/GLjJMtVy3
https://pickup-soccer.net/forums/discussion/top-ways-to-maximize-your-online-gaming-bonuses/
https://myanimelist.net/profile/promocodee1xbet
https://transfur.com/Users/cinaso6600
https://www.newsmusk.com/profile/nejisol34486052/profile
https://unrulydiareis.com/%e5%ae%9f%e5%ae%b6%e3%81%b8/#comment-11729
https://jobs.suncommunitynews.com/profiles/8568431-test-bet26
https://culturesbook.com/1783705119364490_96137
https://eigoblog0405.com/forums/topic/good-day-about-forum/page/6/#post-80701
сеть отелей Современная гостиница на час с удобным графиком работы всегда к вашим услугам. Заезжайте в любой момент для полноценного отдыха.
https://hashnode.com/@todaypromocode
https://alumni.bowdoin.edu/reunion/page.aspx?pid=1124&dgs7010=0&rid7010=24708&tid7010=17437
https://www.leonidastacticalss.com/profile/xbetcasino2152576/profile
https://www.babelcube.com/user/promo-code-1win
https://www.animaljobsdirect.com/profiles/8571745-bonos-betss26
отель римская Наш отель в районе метро Римская отвечает всем современным стандартам гостеприимства. Высокий уровень сервиса гарантируем каждому.
https://oiaedu.com/forums/users/puckett03gissel/
гостиница на час Современная почасовая гостиница с отличными отзывами готова принять вас. Мы гарантируем чистоту и сервис.
https://heylink.me/xbetbets26/
отель на час римская Наш отель в районе Площадь Ильича предлагает стильные интерьеры и безупречную чистоту. Мы всегда рады видеть новых и постоянных гостей.
http://yazikomebel-ru.1gb.ru/user/cillencnht
гостиница на час Наша сеть отелей славится безупречной чистотой и вниманием к деталям. Выбирайте лучшее для себя.
https://postimg.cc/SYkDd6SV
почасовая гостиница Приветливый персонал гостиницы на час поможет вам быстро заселиться. Мы создали все условия для вашего спокойствия.
https://www.bravobookmarks.win/1xbet-registration-promo-code-today-1xwow777-130
https://instaconnect.co//xbetbets26
отель площадь ильича Ищете уютный отель у метро Площадь Ильича для комфортного отдыха? Мы предлагаем современные номера с высоким уровнем сервиса в пешей доступности от станции.
https://mooc.esil.edu.kz/profile/xbetoffer71/
https://worldrank01.blogspot.com/2026/07/melbet-promo-code-exclusive-2026-offer.html
https://fliphtml5.com/home/usonicwave
تخضع المنصة لترخيص دولي يوفر شفافية وأمانًا في كل عملية.
يتيح 888starz أكثر من مئتين وخمسين طاولة مباشرة للروليت والبكارات والبلاك جاك.
يوفر الموقع رهانًا فوريًا وإحصاءات مباشرة على المباريات الجارية.
يمنح 888starz أول إيداع في الكازينو ما يصل إلى 1500 يورو و150 دورة مجانية.
ولا يستغرق فتح حساب من القاهرة سوى دقائق عبر الهاتف أو البريد.
888starz 888starz
يوحّد 888starz تجربة الكازينو والمراهنات الرياضية أمام المستخدم في القاهرة.
يضم القسم آلاف ألعاب السلوت المختارة من استوديوهات مرموقة.
يغطي قسم الرياضة أكثر من 35 نوعًا من كرة القدم والتنس إلى الملاكمة والإي سبورتس.
ويحصل المراهن الرياضي على مكافأة 100% حتى 100 يورو عند أول إيداع.
starz 888 starz 888
يقدم 888starz تسجيلًا سريعًا بخطوات بسيطة وحد إيداع منخفض.
I like what you guys are usually up too. This type of clever work and exposure!
Keep up the amazing works guys I’ve added you guys to our blogroll.
https://xn--41-4lcpj.xn--j1amh/user/gissel84golden/
888starz apk download 888starz apk download
يوفر ملف apk حلًا بديلًا للمستخدمين الذين لا يجدون التطبيق في المتجر.
ينتهي تحميل ملف apk سريعًا لأن حجمه لا يتعدى بضع عشرات من الميغابايت.
يتطلب تثبيت الملف السماح بالتثبيت من مصادر خارجية عبر إعدادات الأمان.
يستطيع المستخدم في مصر إيداع الأموال وسحبها مباشرة من التطبيق.
يتوافق 888starz apk مع الأجهزة المتوسطة ولا يتطلب مواصفات عالية.
يدعم 888starz أجهزة آيفون إلى جانب نسخة apk المخصصة لأندرويد.
https://www.checkli.com/probetts26#/a/process
https://www.newgenstravel.com/forum/topic/68641/top-rated-1xbet-code-promo-opportunities
отель римская Надежная гостиница Площадь Ильича ждет вас для спокойного времяпрепровождения. Мы гарантируем вежливый персонал и сервис.
https://penzu.com/public/6df22ad28e8799be
https://wordrank02.livejournal.com/19867.html?newpost=1
отель площадь ильича Уникальный отель Римская — это ваш выбор для приятного и спокойного проживания. Мы заботимся о комфорте каждого нашего гостя.
https://propterest.com.au/user/92609/xbetbets26
https://decidim.calafell.cat/profiles/freebet1xbets2/activity
تأتي الواجهة معرّبة بالكامل ضمن دعم يتجاوز 50 لغة.
يضم القسم آلاف ألعاب السلوت من استوديوهات موثوقة.
يغطي القسم الرياضي أكثر من 35 نوعًا من كرة القدم والتنس إلى الهوكي والإي سبورتس.
تبلغ باقة الترحيب في الكازينو 1500 يورو إضافة إلى 150 فري سبين.
888stars 888stars
يقدم الموقع خدمة عملاء على مدار الساعة بالعربية إضافة إلى تطبيق apk.
unitree h2
https://www.ameba.jp/profile/general/freepromcod45
медкнижка спб купить
https://bn.quora.com/profile/Betcodeq2
https://independent.academia.edu/DickensVicente
Бокс AGON 24/7 отслеживает бойцов, титулы и промоушены, формируя базу знаний и аналитический взгляд.
https://waysidechapel.org/
психология поведения Чтобы избежать конфликтов, важно научиться слышать партнера, а не просто ждать своей очереди высказаться. Обсуждайте проблемы по мере их появления, а не копите обиды месяцами.
Hey there just wanted to give you a quick heads up. The text in your
article seem to be running off the screen in Ie.
I’m not sure if this is a formatting issue or something to do with web browser compatibility but
I thought I’d post to let you know. The layout look great though!
Hope you get the issue solved soon. Thanks
купить медкнижку в спб
https://app.notion.com/p/bonus-de-bienvenue-3991b5a348e280d0bbc7fb3c04090363?source=copy_link
unitree h2
признаки токсичных отношений Чтобы отпустить бывшего, необходимо перестать следить за его жизнью в социальных сетях и сконцентрироваться на собственном будущем. Со временем фокус сместится с прошлого на ваши личные цели.
يعمل التطبيق باللغة العربية بالكامل وهو ما يناسب اللاعبين في مصر.
يتوفر رابط تنزيل 888starz apk بشكل مباشر ضمن قسم التطبيقات في الموقع.
يتطلب تثبيت الملف السماح بالتثبيت من مصادر خارجية عبر إعدادات الأمان.
يدعم التطبيق وسائل الدفع المحلية والمحافظ الإلكترونية والعملات الرقمية.
لا يُنصح بتحميل ملف apk من مواقع مجهولة قد تحتوي على برمجيات ضارة.
يستفيد لاعبو مصر من الأكواد الترويجية والمكافآت مباشرة من التطبيق.
تنزيل تطبيق 888 تنزيل تطبيق 888
https://www.vnbadminton.com/members/nolan-hanna.89254/
купить готовую медкнижку спб
https://www.noteflight.com/profile/d70c9217db019b8e6f85df1ea3bd752d89c2f70b
https://dzone.com/users/5551615/cartmaster55.html
купить медкнижку в спб приморский район
https://rebrickable.com/users/royalstrike77/
Бокс AGON 24/7 отслеживает бойцов, титулы и промоушены, формируя базу знаний и аналитический взгляд.
гармоничные отношения Отношения мужчины и женщины требуют постоянного обучения искусству слушать и понимать друг друга. Даже при наличии различий в восприятии, общие ценности создают прочный фундамент.
https://jobs.motionographer.com/employers/4247258-les-bonus-de-bienvenue-les-plus-genereux
Тройники с пожарной подставкой ППТФ
продать часы richard mille
gay porn big dick
славянская эстетика
промокод на бронирование яндекс путешествие
Холоднодеформированная труба
https://velog.io/@codgeosxbet/bet-promo-code
тяговые акб для вилочного погрузчика Правильная батарея на вилочный погрузчик купить которую у нас можно в любое время, это залог успеха вашего склада. Заходите к нам за надежностью.
промокод отели
https://penzu.com/public/1ce557bfba657967
тяговые акб для вилочного погрузчика Наши аккумуляторы на электропогрузчики вилочные отличаются стабильной работой при любых нагрузках. Закажите у нас и убедитесь в надежности нашего сервиса.
https://profile.hatena.ne.jp/offersbets26/profile
ломбард часы москва часов
РусскиеСказки
промокод отели
https://comoponercodigo436.wordpress.com/2026/07/15/boost-your-betting-journey-with-a-1xbet-welcome-promotion/
https://www.investagrams.com/Profile/richar4643965
Доска объявлений Объявления России
https://actualites.cava.tn/user/devaldfaxl
https://www.ted.com/profiles/51860647
https://giphy.com/channel/offersbets26
https://kitchendesign.us/user/gundanzuch
In the United Kingdom, True Fortune casino stands out as a trusted online gambling destination.
Progressive jackpots and top-rated new releases are highlighted in the casino lobby.
The VIP scheme gives loyal users cashback boosts, gifts and a personal manager.
Verified players enjoy speedy payouts through their preferred method.
Players in the United Kingdom can use built-in tools to keep their gambling under control.
A 24/7 support team helps players in the United Kingdom through live chat and email.
true fortune 25 chip true fortune 25 chip
True Fortune casino has become a go-to online casino for many players in the United Kingdom.
The game library includes thousands of titles, from classic fruit machines to modern video slots.
The promotions page lists reload bonuses, tournaments and cashback offers.
true fortune casino $50 free chip code true fortune casino $50 free chip code
Deposits and withdrawals can be made with cards, e-wallets and bank transfer.
The casino is licensed and applies strong security to keep accounts and funds safe.
Clear rules and a well-organised help centre keep everything straightforward.
true fortune casino promo code true fortune casino promo code
True Fortune casino has become a go-to online casino for many players in the United Kingdom.
The True Fortune casino features thousands of slots from leading providers like Pragmatic Play, NetEnt and Play’n GO.
First-time players receive a welcome bonus plus free spins after signing up.
Verified players enjoy speedy payouts through their preferred method.
Fair play is guaranteed by independently tested RNG games with published RTP rates.
Customer support is available around the clock via live chat and email in English.
Everything from slots to live tables is available on the official True Fortune site.
Fans of live gaming can join real-dealer tables running 24 hours a day.
Every wager earns loyalty points that can be exchanged for bonus credit.
True Fortune supports popular payment methods including Visa, Mastercard and e-wallets like Skrill and Neteller.
Fair play is guaranteed by independently tested RNG games with published RTP rates.
Players can enjoy the full game library on mobile without installing an app.
truefortune no deposit bonus codes truefortune no deposit bonus codes
maorou_k8m maorou_k8m
Rasmiy veb-sayt o’yinchilarga barcha xizmatlarga qulay kirishni ta’minlaydi.
888Starz rasmiy sayti slot, ruletka va blekjek kabi mingdan ortiq kazino o’yinini taklif etadi.
888Starz rasmiy saytining sport bo’limi 50 dan ortiq sport turiga tikish imkonini beradi.
Rasmiy sayt barcha aksiyalarni topish oson bo’lgan aniq bo’limda namoyish etadi.
888Starz kartalardan elektron hamyonlargacha turli depozit usullarini taklif etadi.
888straz 888straz
True Fortune casino has become a go-to online casino for many players in the United Kingdom.
The live casino section brings authentic tables with professional dealers straight to any device.
True Fortune greets new users in the United Kingdom with a welcome package that boosts the first deposit.
true fortune casino bonus codes true fortune casino bonus codes
Deposits are processed instantly so players can start playing within minutes.
Fair play is guaranteed by independently tested RNG games with published RTP rates.
Transparent terms and a helpful FAQ section cover deposits, bonuses and withdrawals.
888 starz.com 888 starz.com
Rasmiy veb-sayt o’yinchilarga barcha xizmatlarga qulay kirishni ta’minlaydi.
Eng mashhur va yangi o’yinlar rasmiy saytning kazino bo’limida birinchi o’rinda ko’rsatiladi.
888Starz rasmiy saytining sport bo’limi 50 dan ortiq sport turiga tikish imkonini beradi.
Barcha aksiyalar va bonuslar rasmiy saytda aniq ko’rsatiladi va ulardan foydalanish oson.
888Starz kartalardan elektron hamyonlargacha turli depozit usullarini taklif etadi.
Sayt mahalliy o’yinchilar uchun tushunarli o’zbekcha interfeysni taqdim etadi.
Rasmiy saytdagi kazino bo’limi yetakchi provayderlardan ko’plab o’yinlarni o’z ichiga oladi.
888starz apk скачать 888starz apk скачать
Rasmiy sayt raqobatbardosh koeffitsiyentlar bilan jonli tikish rejimini taklif etadi.
Foydalanuvchilar uchun haftalik keshbek va promo aksiyalar doimiy ravishda mavjud.
Rasmiy sayt karta, hamyon va kripto orqali 5 dollardan boshlanadigan qulay to’lovlarni taqdim etadi.
The official True Fortune casino has built a strong reputation with players across the United Kingdom.
True Fortune regularly adds new titles and jackpot games to the lobby.
Ongoing offers such as weekly cashback and reload deals keep the balance topped up.
The casino aims to process cashouts fast, especially for verified accounts.
All games run on certified random number generators for provably fair results.
The support team responds quickly via chat and email at any hour.
true fortune casino no deposit bonus free spins true fortune casino no deposit bonus free spins
Sayt mahalliy o’yinchilar uchun tushunarli o’zbekcha interfeysni taqdim etadi.
Top reytingli slotlar rasmiy sayt interfeysida alohida ajratib beriladi.
Rasmiy saytda jonli tikish koeffitsiyentlari o’yin davomida real vaqtda yangilanadi.
Rasmiy saytda har hafta keshbek va tikishlar uchun sug’urta kabi muntazam aksiyalar taklif etiladi.
Rasmiy sayt foydalanuvchilarga sutkalik yordamni bir nechta aloqa kanali orqali taqdim etadi.
888starbet 888starbet
https://www.max2play.com/en/forums/users/codepromomel/
888Starz rasmiy veb-sayti foydalanuvchilarga kazino va sport stavkalarini bitta platformada taqdim etadi.
Rasmiy saytda yangi nashrlar va ommabop o’yinlar bosh sahifada namoyon bo’ladi.
Rasmiy saytda futbol, tennis, basketbol va kibersport kabi ko’plab sport turlari mavjud.
888starz casino официальный сайт 888starz casino официальный сайт
Barcha aksiyalar va bonuslar rasmiy saytda aniq ko’rsatiladi va ulardan foydalanish oson.
Texnik yordam o’zbek va rus tillarida sutka davomida chat, email va telefon orqali ishlaydi.
Защита персональных данных становится важной частью повседневного использования интернета. Полезные материалы доступны на VLESSNET для России. Современные технологии помогают повысить уровень цифровой безопасности.
Designed with players in the United Kingdom in mind, the site keeps registration and play simple.
The live casino section brings authentic tables with professional dealers straight to any device.
Every wager earns loyalty points that can be exchanged for bonus credit.
Deposits and withdrawals can be made with cards, e-wallets and bank transfer.
Independent audits confirm the games are fair and payouts are genuine.
Help is always at hand thanks to round-the-clock live chat support.
true fortune 25 chip true fortune 25 chip
The site combines a huge game library with a clean, modern interface.
Fans of live gaming can join real-dealer tables running 24 hours a day.
First-time players receive a welcome bonus plus free spins after signing up.
true casino true casino
Deposits are processed instantly so players can start playing within minutes.
Fair play is guaranteed by independently tested RNG games with published RTP rates.
Clear rules and a well-organised help centre keep everything straightforward.
https://shkolaiskusstw.ru/
http://vip-barnaul.ru/
https://wiki-canyon.win/index.php/Sportsbook_Bonus:_17_Strong_Ways_to_Take_full_advantage_of_Real_Value
Запчасти к гидронасоса купить Краснодар
трансы Екатеринбург
https://bbs.darkml.net/home.php?mod=space&uid=224846
порно 3д
купить конвейерную ленту Компания «ЭРА» предлагает удобный сервис заказа конвейерных лент с доставкой по всей территории России. Вся актуальная информация размещена на нашем сайте era-el.ru.
https://therockpit.net/wp-content/pages/melbet_free_promo_code_enter__.html
Keep on working, great job!
色情帥哥
Где лучше раскрутка сайтов заказать — на фриланс-бирже или у агентства?
https://xn—-itbblhvdkjdur.xn--p1ai/
Авто из Кореи Цены на подержанные корейские автомобили остаются одними из самых конкурентоспособных на рынке. Это позволяет купить машину классом выше за те же деньги.
https://www.nonnagrishaeva.ru/
Запчасти гидронасоса Кубани
https://entre-vos-mains.alsace.eu/profiles/melbetspro26/timeline
https://ryu-ga-index.com:443/index.php?whitakerlindgaard770329
https://activplus.ru/communication/forum/messages/forum3/message56/191-promokod-melbet-na-pervyy-depozit-2026-start888-25000?result=new#message56
путешествия бронирование промокоды
https://svisgaz.by/forum/messages/forum1/topic2936/message5145/?result=new#message5145
https://www.sitebs.ru/blogs/125195.html
http://tvtmarina.ru/forum/topic/%d0%bf%d1%80%d0%be%d0%bc%d0%be%d0%ba%d0%be%d0%b4-%d0%b4%d0%bb%d1%8f-%d0%b1%d0%ba-melbet-2026-game888-%d0%b1%d0%be%d0%bd%d1%83%d1%81-%d0%b4%d0%be-25000-%e2%82%bd/#postid-157676
dating com scam
http://karayaz.ru/user/glovercraft1/
https://zemtsova.forum24.ru/?1-13-0-00000563-000-0-0-1784308151
p179d85
Микрокредитные организации
http://tataesk.ru/forum/messages/forum1/topic229/message320/?result=new#message320
“индивидуальный предприниматель Муравьев Александр Викторович публичная оферта”
акции яндекс путешествия промокод
найти девушку ЛНР
Transmission consult workshop mercedes мерседес
https://golinkdirectory.com/listings13697046/melbet-%D0%9E%D1%84%D0%B8%D1%86%D0%B8%D0%B0%D0%BB%D1%8C%D0%BD%D1%8B%D0%B9-%D0%A1%D0%B0%D0%B9%D1%82-%D0%9F%D1%80%D0%BE%D0%BC%D0%BE%D0%BA%D0%BE%D0%B4-auf888
http://center-2.ru/forum/?mingleforumaction=viewtopic&t=28901#postid-51797
https://sundaynews.info/user/craftrosa2/
http://diafan.rusheat.ru/forum/melbet-promokod-na-stavku-game888—bonus-15000-/
https://hyundaimobil.co.id/assets/articles/1xbet_kode_promo_indonesia___bonus_selamat_datang.html
dating com
https://sportape.ru/
p179d00 ошибка мерседес
порно с разговорами на русском языке
Займы на карту
https://downtownmiami.com/profile/jack-garlick/
https://www.mindmeister.com/users/channel/132398455
https://logcla.com/blogs/1707375/1xBet-Promo-Code-BD-1XSUN200-130-Bangladesh-Deal
dating com scam
https://bn.quora.com/profile/ZenithCraze3
https://saumalkol.com/forum/разное-1/43170-melbet-актуальный-промокод-2026-amg888-бонус-до-25,000-?.html
https://amt.tstu.ru/ru/cb-profile/pluginclass/cbblogs.html?action=blogs&func=show&id=20
http://www.santa4.su/topic/71692-melbet-aktualnyy-promokod-amg888-bonus-15000-%E2%82%BD/
Very good information. Lucky me I found your site by accident (stumbleupon).
I have saved as a favorite for later!
Знакомства Луганск ТГ
Рейтинг МФО по надежности
залоги золота сочи залоги золота сочи
https://www.jointcorners.com/read-blog/196873
https://connect.gt/user/newmelbet
кейтеринг под ключ Красногорск Профессиональный кейтеринг в Красногорске поможет сделать ваше мероприятие незабываемым и вкусным. Мы предлагаем полный спектр услуг по организации питания на любом торжестве.
https://qaltik.com/marketing/%D0%BF%D1%80%D0%BE%D0%BC%D0%BE%D0%BA%D0%BE%D0%B4-1xbet-%D0%B1%D0%B5%D0%B7%D0%B4%D0%B5%D0%BF%D0%BE%D0%B7%D0%B8%D1%82%D0%BD%D1%8B%D0%B9-%D0%B1%D0%BE%D0%BD%D1%83%D1%81-2026-acebig/
https://webyourself.eu/blogs/2066132/Code-Promo-1xBet-Inscription-2026-1XWIDE-Bonus-VIP
https://flashjournal.site/item/1xbet-2026-1xsand-32-500
https://jali.me/allforwater1
ломбард сочи ломбард золота сочи
https://letterboxd.com/tylergeake2026/
https://ja.cofacts.tw/user/newmelbet
Casino udrn RORUS
https://notes.medien.rwth-aachen.de/s/tVgqzLvOGF
https://megabetcasino.edu.pl/why-slot-online-habituation-is-more-treacherous-than-you-think/#comment-328
моечная ванна вмн-2 1200х600 Моечная ванна нержавеющая 1200 обладает превосходной коррозийной стойкостью и длительным сроком службы. Это вложение в оснащение кухни на долгие годы.
https://www.hea.edu.au/profile/bonuscode2524590/profile
https://firesafety-vniipo.ru/forum/registratsiya-melbet-promokod-2026-rush200/
шведский стол Красногорск Выездной фуршет в Красногорске — это идеальный вариант для деловых встреч или торжественных приемов. Мы предлагаем эстетичную подачу и безупречное качество закусок.
https://obiko.ru/forum/topic/promokod-melbet-na-stavku-cash888/#postid-4505
https://microxtec.com/MitForum/viewtopic.php?t=3838
https://getidealist.com/story23737059/code-promo-vip
https://experiment.com/users/promocyjny23
купить ванну моечную 1200х600 нержавейка Модель ВМН-2 1200х600х850 от проверенного производителя — гарантия надежности вашего производства. Высококачественная сталь легко чистится и дезинфицируется.
https://t.me/KohLantaKrabiThailand ко ланта
https://izhevsk.ru/forummessage/88/6154494.html
https://www.pearltrees.com/johnathan7111#item808577702
https://www.diigo.com/item/note/bqkqq/5hg7?k=b4f10a777fbdb56cffcb89177cbccfc4
Barcelona Chauffeur Service Barcelona Airport Transfers | Private Transfers in Catalonia & Costa Brava
Planning your trip to Spain? Karabetoff Transfers offers reliable private airport transfers across Barcelona, Costa Brava, and Catalonia. Whether you’re travelling for a holiday, business trip, or family vacation, we make your journey comfortable, safe, and stress-free.
Why Choose Karabetoff Transfers?
We focus on providing a premium travel experience with professional service and fixed prices.
Our Services
Barcelona Airport Transfers
Girona Airport Transfers
Reus Airport Transfers
Hotel Transfers
Cruise Port Transfers
Train Station Transfers
Long Distance Transfers
Private Chauffeur Service
Popular Destinations
We provide transfers to and from:
Barcelona
Lloret de Mar
Tossa de Mar
Blanes
Calella
Pineda de Mar
Malgrat de Mar
Santa Susanna
Cambrils
Salou
Tarragona
Sitges
Costa Brava Resorts
Catalonia
Why Travel With Us?
Fixed prices with no hidden costs
Comfortable and spacious vehicles
Professional and friendly drivers
Flight monitoring for airport pickups
Meet & Greet service at arrivals
Door-to-door private transfers
Ideal for families, couples and business travellers
Travel Tips
Booking your airport transfer in advance saves time and avoids long taxi queues during the busy holiday season. If you’re visiting the Costa Brava, an airport transfer is often the fastest and most comfortable way to reach your hotel or resort.
For families travelling with children, child seats are available on request. We also have plenty of luggage space for large suitcases, sports equipment and beach gear.
Frequently Asked Questions
Do you offer fixed prices?
Yes. The price is confirmed before your trip, with no hidden fees.
Can I book a return transfer?
Yes. You can book one-way or return transfers.
Do you monitor flight delays?
Yes. We monitor your flight and adjust the pickup time if necessary.
Which airports do you serve?
Barcelona Airport (BCN), Girona Airport (GRO) and Reus Airport (REU).
Can I pay online?
Yes. Contact us for available payment options.
Book Your Transfer
Whether you need a transfer from Barcelona Airport, Girona Airport, or Reus Airport, Karabetoff Transfers is ready to make your journey smooth and comfortable.
https://kitehurghada.ru/
https://www.ttlxshipping.com/forum/topic/521446/1xbet-promo-code-pk
Airport Taxi Catalonia Barcelona Airport Transfers | Private Transfers in Catalonia & Costa Brava
Planning your trip to Spain? Karabetoff Transfers offers reliable private airport transfers across Barcelona, Costa Brava, and Catalonia. Whether you’re travelling for a holiday, business trip, or family vacation, we make your journey comfortable, safe, and stress-free.
Why Choose Karabetoff Transfers?
We focus on providing a premium travel experience with professional service and fixed prices.
Our Services
Barcelona Airport Transfers
Girona Airport Transfers
Reus Airport Transfers
Hotel Transfers
Cruise Port Transfers
Train Station Transfers
Long Distance Transfers
Private Chauffeur Service
Popular Destinations
We provide transfers to and from:
Barcelona
Lloret de Mar
Tossa de Mar
Blanes
Calella
Pineda de Mar
Malgrat de Mar
Santa Susanna
Cambrils
Salou
Tarragona
Sitges
Costa Brava Resorts
Catalonia
Why Travel With Us?
Fixed prices with no hidden costs
Comfortable and spacious vehicles
Professional and friendly drivers
Flight monitoring for airport pickups
Meet & Greet service at arrivals
Door-to-door private transfers
Ideal for families, couples and business travellers
Travel Tips
Booking your airport transfer in advance saves time and avoids long taxi queues during the busy holiday season. If you’re visiting the Costa Brava, an airport transfer is often the fastest and most comfortable way to reach your hotel or resort.
For families travelling with children, child seats are available on request. We also have plenty of luggage space for large suitcases, sports equipment and beach gear.
Frequently Asked Questions
Do you offer fixed prices?
Yes. The price is confirmed before your trip, with no hidden fees.
Can I book a return transfer?
Yes. You can book one-way or return transfers.
Do you monitor flight delays?
Yes. We monitor your flight and adjust the pickup time if necessary.
Which airports do you serve?
Barcelona Airport (BCN), Girona Airport (GRO) and Reus Airport (REU).
Can I pay online?
Yes. Contact us for available payment options.
Book Your Transfer
Whether you need a transfer from Barcelona Airport, Girona Airport, or Reus Airport, Karabetoff Transfers is ready to make your journey smooth and comfortable.
AI Coding Lab Наша образовательная платформа с ИИ создана для того, чтобы обучение стало для вас легким и по-настоящему вдохновляющим процессом. Учитесь у лучших, чтобы стать лучшим.
https://snippet.host/xkwetd
https://baskadia.com/user/h73j
https://kitehurghada.ru/
Tarragona Transfer Barcelona Airport Transfers | Private Transfers in Catalonia & Costa Brava
Planning your trip to Spain? Karabetoff Transfers offers reliable private airport transfers across Barcelona, Costa Brava, and Catalonia. Whether you’re travelling for a holiday, business trip, or family vacation, we make your journey comfortable, safe, and stress-free.
Why Choose Karabetoff Transfers?
We focus on providing a premium travel experience with professional service and fixed prices.
Our Services
Barcelona Airport Transfers
Girona Airport Transfers
Reus Airport Transfers
Hotel Transfers
Cruise Port Transfers
Train Station Transfers
Long Distance Transfers
Private Chauffeur Service
Popular Destinations
We provide transfers to and from:
Barcelona
Lloret de Mar
Tossa de Mar
Blanes
Calella
Pineda de Mar
Malgrat de Mar
Santa Susanna
Cambrils
Salou
Tarragona
Sitges
Costa Brava Resorts
Catalonia
Why Travel With Us?
Fixed prices with no hidden costs
Comfortable and spacious vehicles
Professional and friendly drivers
Flight monitoring for airport pickups
Meet & Greet service at arrivals
Door-to-door private transfers
Ideal for families, couples and business travellers
Travel Tips
Booking your airport transfer in advance saves time and avoids long taxi queues during the busy holiday season. If you’re visiting the Costa Brava, an airport transfer is often the fastest and most comfortable way to reach your hotel or resort.
For families travelling with children, child seats are available on request. We also have plenty of luggage space for large suitcases, sports equipment and beach gear.
Frequently Asked Questions
Do you offer fixed prices?
Yes. The price is confirmed before your trip, with no hidden fees.
Can I book a return transfer?
Yes. You can book one-way or return transfers.
Do you monitor flight delays?
Yes. We monitor your flight and adjust the pickup time if necessary.
Which airports do you serve?
Barcelona Airport (BCN), Girona Airport (GRO) and Reus Airport (REU).
Can I pay online?
Yes. Contact us for available payment options.
Book Your Transfer
Whether you need a transfer from Barcelona Airport, Girona Airport, or Reus Airport, Karabetoff Transfers is ready to make your journey smooth and comfortable.
http://www.automingwei.com/home.php?mod=space&uid=330815
https://morguefile.com/creative/betwinnerkod
https://www.japaaan.com/user/111186/
https://peatix.com/user/30134141/
https://volgograd.venoteka.ru/club/forum/messages/forum9/topic185/message3362/?result=new#message3362
date a live hentai
https://moxymuse.com/forums/users/morrisbaird1/
https://beteiligung.amt-huettener-berge.de/profile/1xmaxcus/
https://docs.lokavaluto.fr/s/ZsyVEYFev
You’ve made some good points there. I checked on the internet for additional information about the issue and found most people will go
along with your views on this website.
https://quomon.es/Profile/1xbetpromo9/
https://kultura-shakhty.ru/forum/messages/forum1/message2886/1144-promokod-mostbet-2026-mega888-bonus-125-do-25-000#postform
https://t.me/detivetrachat
бесплатнаЯ нейросеть GROM GPTunneL – платформа длЯ работы с современными нейросетЯми и AI-инструментами в одном интерфейсе. ‘ервис предоставлЯет доступ к популЯрным Языковым моделЯм, инструментам длЯ генерации изображений, программированиЯ, анализа данных и решениЯ повседневных задач. Џользователи могут сравнивать различные AI-модели, тестировать новые технологии искусственного интеллекта и выбирать подходЯщие решениЯ длЯ работы, обучениЯ и творчества.
http://toyota-porte.ru/forums/index.php?autocom=gallery&req=si&img=5276
https://t.me/detivetrachat
https://pad.darmstadt.social/s/ABa0s6I0a5
http://www.riocenter.kz/forum/read/id-4251
https://xn—-itbblhvdkjdur.xn--p1ai/
нейросети онлайн GPTunneL – платформа длЯ работы с современными нейросетЯми и AI-инструментами в одном интерфейсе. ‘ервис предоставлЯет доступ к популЯрным Языковым моделЯм, инструментам длЯ генерации изображений, программированиЯ, анализа данных и решениЯ повседневных задач. Џользователи могут сравнивать различные AI-модели, тестировать новые технологии искусственного интеллекта и выбирать подходЯщие решениЯ длЯ работы, обучениЯ и творчества.
straight lads naked
https://audio.com/linebet074
https://topsoccerganmes.com/bonos-de-bienvenida-en-casinos-cmo-aprovecharlos-al-mximo/
trip75 at сайт трипскан
https://onlinevetjobs.com/author/starz88efx/
https://casinoevents.edu.pl/why-sbobet88-is-the-best-online-indulgent-platform-for-asian-players/#comment-109
https://telegra.ph/Turn-Your-First-Deposit-Into-More-Playtime-with-the-1xbet-promo-code-07-20
Вы публикуете подробная информация по теме дорожных работ.
https://chesskomi.borda.ru/?1-10-0-00000802-000-0-0-1782889198
trip76 co трипскан вход
https://jobs.lajobsportal.org/profiles/8619575-linebet074-outlook-com-bet
https://archives.profsurv.com/forum/ProfessionalSurveyorMagazineDiscussion/General-Surveying/-New-Zealand-Kiwi-Treats-Sweet-Lollies-and-Chocolate-Favorites-152857.aspx?pg=3
https://huayra.educar.gob.ar/ayuda/?qa=user/chancebet26
https://www.bridgescdc.com/profile/onlinebetting2/profile
трипскан трипскан
https://www.inspirestrongfitness.com/profile/codeebets2652679/profile
https://www.roton.com/forums/users/brettgibsonckbut/
https://collectednotes.com/pro-bets/1xbet-free-spins-promo-code-today-2026-1xlux777
trip scan трипскан личный
https://voltsite.ru
delia rose pussy
https://aiti.edu.vn/members/offerbett26.60438/
порно домогание
main ingredient in viagra
https://www.akaqa.com/question/q19192718345-1xbetfreee
https://hanson.net/users/1xbetbonuscode26
AI Coding Lab С помощью веб-разработки с Copilot вы сможете выпустить свой проект в несколько раз быстрее конкурентов. Учитесь использовать нейросети для ускорения вашего профессионального роста.
http://hkeverton.com/forumnew/home.php?mod=space&uid=692093
жилье недорого в Анталии Популярная аренда посуточно в Анталии позволяет туристам самим решать, где обедать и как планировать свой день. Готовьте любимые блюда на собственной кухне или посещайте местные рестораны.
how long dors viagra last
https://2cast.com/
https://whimsical.com/xbet-promo-code/1xbet-welcome-bonus-2026-everything-you-need-to-know-EounQZ5vC6jM1rXzTrgWYP
https://www.bizbangboom.com/professional-services/1xbet-promo-code-list-2028
https://www.simplexthailand.com/forum/topic/50213/1xbetfree
http://www.bakinsky-dvorik.ru/communication/forum/messages/forum5/message113964/71954-trusted-slot-site-casino-your-gateway-to-fast-maxwin-2025?result=new#message113964
https://hilfe.orrs.de/user/bettingoffers2
https://www.ceacuautla.edu.mx/profile/xbetfreebet13589613/profile
female pink viagra
https://posteezy.com/tout-savoir-sur-le-bonus-de-premier-depot-et-les-conditions-dactivation
https://www.yumpu.com/user/1xbetfreebets78934
The 888starz application has spread quickly among smartphone owners in Uzbekistan.
The app installs as soon as the apk file is opened and the steps are confirmed.
The Android version of the 888starz app stands out for its speed and comfortable design.
The permissions requested by the app should be reviewed before completing installation.
The iOS version offers the same performance as the Android one with an interface refined for Apple devices.
888starz 888starz
888starz 888starz apk
The 888starz apk is available for direct download on Android phones with ease.
Installing the apk finishes in a short time, making the app ready instantly.
The apk supports automatic updates so users always have the latest version.
Updating the app periodically ensures a safer, more stable experience for the user.
888starz supports iOS devices so iPhone users can install the app easily.
жилье посуточно в Анталии Надежная аренда жилья в Анталии открывает двери в мир комфорта, безопасности и потрясающих морских пейзажей. Вы заслуживаете лучшего отдыха на побережье.
https://matkafasi.com/user/xbetfreebets7
https://ivpaste.com/v/7yPRiydr8F
https://www.notebook.ai/users/1402668
safe viagra
The site combines a huge game library with a clean, modern interface.
The game library includes thousands of titles, from classic fruit machines to modern video slots.
The promotions page lists reload bonuses, tournaments and cashback offers.
Fast, transparent withdrawals mean winnings reach players without long delays.
The casino is licensed and applies strong security to keep accounts and funds safe.
Players can enjoy the full game library on mobile without installing an app.
truefortune casino no deposit bonus truefortune casino no deposit bonus
The platform is licensed internationally, ensuring full protection of player accounts.
Players can join over 300 live casino tables with real dealers at any time.
888starz provides high payout rates and in-play betting during matches.
The official 888starz site gives new players in Uzbekistan a welcome package of up to 1500 euros with 150 free spins.
The official site provides continuous support all day in multiple languages across several channels.
888starz apk 888starz apk
888starz apk 888starz
The 888starz apk is available for direct download on Android phones with ease.
The app installs quickly so the user can open it right away.
The apk supports automatic updates so users always have the latest version.
Keeping the app regularly updated helps close any gaps and raises the security level.
888starz supports iOS devices so iPhone users can install the app easily.
https://theafricavoice.com/profile/betkingmx
The platform features a simple design that helps users in Uzbekistan navigate with ease.
The 888starz casino features more than 5000 games from top providers like Pragmatic Play, NetEnt and Microgaming.
Players can bet on major competitions from the English league to the top tournaments in Uzbekistan.
888starz highlights the latest bonuses and promotions available to players in Uzbekistan.
888starz offers various deposit options from cards to digital wallets and more than 30 cryptocurrencies.
888starz 888starz apk
https://medichat.ru/viewtopic.php?t=1248
Everything from slots to live tables is available on the official True Fortune site.
The lobby showcases jackpot slots and the latest releases right at the top.
First-time players receive a welcome bonus plus free spins after signing up.
Minimum deposits are low, making it easy to get started.
True Fortune promotes responsible gaming with limits, time-outs and support links.
True Fortune works seamlessly on smartphones and tablets straight from the browser.
true fortune 50 free spins true fortune 50 free spins
https://www.speedrun.com/users/millionwaves1
In the United Kingdom, True Fortune casino stands out as a trusted online gambling destination.
True Fortune regularly adds new titles and jackpot games to the lobby.
Ongoing offers such as weekly cashback and reload deals keep the balance topped up.
The casino accepts a range of payment options familiar to players in the United Kingdom.
Fair play is guaranteed by independently tested RNG games with published RTP rates.
The support team responds quickly via chat and email at any hour.
truefortune no deposit truefortune no deposit
Everything from slots to live tables is available on the official True Fortune site.
Big-money jackpots and trending games are easy to find on the homepage.
A welcome offer with matched bonus funds and free spins awaits new players in the United Kingdom.
The casino accepts a range of payment options familiar to players in the United Kingdom.
True Fortune promotes responsible gaming with limits, time-outs and support links.
New users can check the FAQ for quick guidance on bonuses and payments.
truefortune casino no deposit bonus codes truefortune casino no deposit bonus codes
Everything from slots to live tables is available on the official True Fortune site.
True Fortune regularly adds new titles and jackpot games to the lobby.
Players enjoy recurring promotions including cashback and free spins on selected slots.
Fast, transparent withdrawals mean winnings reach players without long delays.
Players in the United Kingdom can use built-in tools to keep their gambling under control.
New users can check the FAQ for quick guidance on bonuses and payments.
true fortune free spins true fortune free spins
The platform is fully optimised for players in the United Kingdom with English support and local payment options.
True Fortune regularly adds new titles and jackpot games to the lobby.
First-time players receive a welcome bonus plus free spins after signing up.
truefortune casino truefortune casino
Players can fund their account via cards, digital wallets and modern payment services.
The site offers deposit limits, reality checks and self-exclusion for safer play.
The support team responds quickly via chat and email at any hour.
https://decidim.calafell.cat/profiles/1xbetvip2027/activity
The casino welcomes players from the United Kingdom with a localised experience and responsive support.
The game library includes thousands of titles, from classic fruit machines to modern video slots.
A welcome offer with matched bonus funds and free spins awaits new players in the United Kingdom.
The casino accepts a range of payment options familiar to players in the United Kingdom.
All games run on certified random number generators for provably fair results.
true fortune 25 free spins no deposit true fortune 25 free spins no deposit
A detailed FAQ and clear terms make it easy for players in the United Kingdom to find answers fast.
The platform features a simple design that helps users in Egypt navigate with ease.
888starz showcases top-rated and newly added games within the casino lobby.
The official site allows betting on more than 50 sports covering major global events.
888starz highlights the latest bonuses and promotions available to players in Egypt.
The official 888starz site supports multiple payment methods including bank cards and e-wallets like Skrill and Neteller.
888starz 888starz apk
https://www.adpost4u.com/user/profile/4607019
https://italiascarpa.ru/forum/messages/forum1/topic1127/message3810/?result=new#message3810
Everything from slots to live tables is available on the official True Fortune site.
True Fortune regularly adds new titles and jackpot games to the lobby.
A welcome offer with matched bonus funds and free spins awaits new players in the United Kingdom.
The casino accepts a range of payment options familiar to players in the United Kingdom.
True Fortune operates under an official licence and uses SSL encryption to protect player data.
True Fortune works seamlessly on smartphones and tablets straight from the browser.
true fortune home true fortune home
Designed with players in the United Kingdom in mind, the site keeps registration and play simple.
The game library includes thousands of titles, from classic fruit machines to modern video slots.
True Fortune greets new users in the United Kingdom with a welcome package that boosts the first deposit.
Withdrawals are handled quickly, with e-wallet payouts often completed the same day.
Responsible gambling tools let players set deposit limits, take breaks or self-exclude.
Help is always at hand thanks to round-the-clock live chat support.
true fortune free 250 chip no deposit codes 2026 true fortune free 250 chip no deposit codes 2026
https://git.disroot.org/xbetbonus11
In the United Kingdom, True Fortune casino stands out as a trusted online gambling destination.
Big-money jackpots and trending games are easy to find on the homepage.
Regular promotions include reload bonuses, cashback and free spin drops throughout the week.
truefortune casino no deposit bonus codes truefortune casino no deposit bonus codes
Players can fund their account via cards, digital wallets and modern payment services.
Player information is protected with encryption and strict data-handling standards.
Help is always at hand thanks to round-the-clock live chat support.
https://virtualdub.ru/forum/kodeki/topic-94.html
https://businessbookmark.com/story7395087/%D0%9C%D0%B5%D0%BB%D0%B1%D0%B5%D1%82-%D0%9E%D1%84%D0%B8%D1%86%D0%B8%D0%B0%D0%BB%D1%8C%D0%BD%D1%8B%D0%B9-%D0%A1%D0%B0%D0%B9%D1%82-%D0%9F%D1%80%D0%BE%D0%BC%D0%BE%D0%BA%D0%BE%D0%B4-2026-vip200new
https://supermoto.bbforum.be/post65125.html#65125
lis skins cs2 skins
В Адлере сезон пиковый с мая по сентябрь молодежный отдых Сочи
buy xanax without prescrition
https://168.exodirectory.com/index.php?topic=282502.new#new
отдых в Сочи для пенсионеров отдых в Сочи для пенсионеров
https://www.rossoneriblog.com/author/melbetpromocoderu/
https://sciencemission.com/profile/melbetpromocoderu
lis skin cs2
чат с ии подругой топ генераторов чат с ai подругой топ сервисов
Betify
https://www.mapleprimes.com/users/elamedprom888
https://2cast.com/
The platform is fully optimised for players in the United Kingdom with English support and local payment options.
Big-money jackpots and trending games are easy to find on the homepage.
Frequent players climb a VIP ladder that unlocks better rewards and faster withdrawals.
True Fortune supports popular payment methods including Visa, Mastercard and e-wallets like Skrill and Neteller.
true fortune 50 free spins promo code true fortune 50 free spins promo code
True Fortune operates under an official licence and uses SSL encryption to protect player data.
Clear rules and a well-organised help centre keep everything straightforward.
The 888starz apk is available for direct download on Android phones with ease.
Before installing the apk on Android, allow installation from external sources.
The Android version is compatible with most phones, including lower-spec models.
It is advisable to check the apk permissions during installation to protect data privacy.
The iOS version offers the same performance as the Android one with an interface refined for Apple devices.
888starz 888starz
Взломать вибер
https://aiinsight.forumieren.de/viewtopic.php?t=537
https://www.zupyak.com/p/4983058/t/bonus-bez-depozytu-przewodnik-2026
cialis canada
https://fetchhcup.com
трансы Иркутск
Удаленный доступ
https://boston-consult.com
https://betwad.com/1xbet-promo-code-free-2027-1x200star-welcome-offer/
Betify casino FR
kasina za ceske koruny
https://mspinky313.com
https://notes.io/e4v19
Помощь программиста
https://owchemy.com/1xbet-promo-code-today-1x200star-e130-bonus/
https://mspinky313.com
https://life-secrets.ru/samye-chastye-oshibki-pri-podgotovke-k-toefl.html
трансы воронеж
site officiel Betify
Взломать сайт
kasina za ceske koruny
https://nash-summit.com
https://liberalwiki.space/wiki/Bono_de_Apuestas_Deportivas_Cmo_Aprovechar_las_Mejores_Promociones_para_Apostar_con_Inteligencia
Удаленный доступ к пк
kasina za ceske koruny
Вернуть деньги которые украли
True Fortune casino is one of the most popular online casinos among players in the United Kingdom.
Progressive jackpots and top-rated new releases are highlighted in the casino lobby.
True Fortune greets new users in the United Kingdom with a welcome package that boosts the first deposit.
Deposits and withdrawals can be made with cards, e-wallets and bank transfer.
Fair play is guaranteed by independently tested RNG games with published RTP rates.
The support team responds quickly via chat and email at any hour.
true fortune casino no deposit bonus free chips true fortune casino no deposit bonus free chips
kasina za ceske koruny
rendering studio
автовыкуп
https://gidromashin.com/product-category/zapchasti-k-gidronasosam/page/17/
https://m.b2best.at
https://bs2bist.at
одобрение ипотеки 2026 одобрение семейной ипотеки 2026
https://blse.at
карго поставщики Качественная доставка сборных грузов из Китая помогает оптимизировать транспортные расходы и развивать бизнес без лишних инвестиций. Наши логисты разработают максимально эффективный маршрут специально для вас.
выкуп битых авто
одобрение ипотеки 2026 семейная ипотека 2026
3d architectural exterior rendering
карго доставка Удобная карго доставка из Китая избавляет вас от сложностей с международными расчетами и оформлением деклараций. Мы берем всю рутинную работу на себя, экономя ваше время.
https://bs2best2.art
выкуп и доставка товаров из китая Организация доставка сборных грузов из Китая выполняется на высоком профессиональном уровне с использованием современных складских комплексов. Ваши товары будут надежно упакованы и защищены от любых повреждений.
https://lbs2best.at
Introduction: true fortune casino stands out as a modern iGaming destination that has quickly built a reputation across the UK. Anchored by its main hub at true-fortune.com, the brand positions itself as an all-in-one destination for casino entertainment. Some players know it as truefortune or even true-fortune casino, the offering is tailored for those chasing a polished and safe GB-oriented environment.
On the game collection, the site serves up a seriously large selection — somewhere in the region of 4,000+ titles. Big-name studios like Pragmatic Play, Big Time Gaming and Betsoft supply the reels, delivering generous return-to-player rates, progressive jackpots alongside old-school fruit machines. Payouts on many titles frequently stretch to the tens of thousands, which keeps things interesting.
Live dealer play is a genuine highlight. Powered by Evolution and Pragmatic Play Live, UK members can join authentic dealer tables around the clock. Human croupiers deal in real time from purpose-built studios, with fun entertainment titles such as Monopoly Live top off the experience. The result is as close to a real casino as online play gets.
Bonuses and offers, the operator keeps things generous. Fresh sign-ups can claim a sign up bonus up to ?1,500 across your first deposits, while regulars enjoy a free spins deal to start with. Loyalty perks and reloads and a rewards ladder keep existing players busy, though it’s always worth reading the wagering requirements on each promo. UK readers can check the latest offers at 100 free spins promo codes for true fortune casino no deposit whenever you like.
When it’s time to bank, true fortune casino handles a broad mix of banking options — debit cards, Skrill and Neteller, plus crypto options like Bitcoin. Sign-up is just a couple of minutes, with a low first deposit of about ?10, and payouts are handled fast.
To wrap up, this operator rounds things off with 24/7 help via live chat and email, a responsive mobile app for iOS and Android, and solid regulation and SSL encryption. For UK players after a trustworthy, feature-rich casino, it’s firmly on the shortlist.
перевозка грузов из китая Качественная доставка сборных грузов из Китая помогает оптимизировать транспортные расходы и развивать бизнес без лишних инвестиций. Наши логисты разработают максимально эффективный маршрут специально для вас.
kasina za ceske koruny
https://gidromashin.com/shop/
Introduction: the true casino brand known as true fortune is a modern iGaming destination that has rapidly built a reputation across the UK. Anchored by its main hub at true-fortune.com, the brand positions itself as a one-stop home for slots, tables and live gaming. Some players know it as truefortune or even true-fortune casino, the offering caters to those chasing a polished and safe GB-oriented experience.
When it comes to game catalogue, true fortune casino offers a seriously large selection — expect 3,000 to 5,000+ titles. Leading providers like NetEnt, Microgaming and Yggdrasil sit behind the selection, which means generous return-to-player rates, Megaways mechanics alongside classic favourites. Payouts on many titles often stretch to the tens of thousands, helping keep the sessions exciting.
The live casino is a real draw here. Streamed via Evolution and Pragmatic Play Live, players can join professionally hosted games around the clock. Human croupiers deal in real time from purpose-built studios, plus engaging show-style formats such as Monopoly Live complete the offering. It’s about as authentic as a screen allows.
Bonuses and offers, true fortune casino keeps things generous. New players can claim a sign up bonus up to ?500 and 200 free spins, while regulars enjoy a free spins deal to start with. Cashback, reload offers and a tiered VIP scheme reward loyalty, so it’s smart to reading the wagering requirements before you claim. UK readers can find out more at truefortune no deposit for the freshest deals.
For deposits and cashouts, the cashier accepts all the usual payment methods — debit cards, e-wallets like Neteller, plus crypto options like Bitcoin. Registration takes quick and painless, starting from a small minimum deposit around ?10, and payouts are processed swiftly.
To wrap up, true fortune casino rounds things off with round-the-clock customer support, a slick mobile experience, and proper licensing and security. For UK players who want a modern, generous site, this one is firmly on the shortlist.
выкуп авто на разбор
Introduction: the true casino brand known as true fortune is a modern iGaming destination that has quickly built a reputation with British punters. Anchored by its main hub at true-fortune.com, the operator markets itself as a full-service destination for slots, tables and live gaming. You may also see it referred to as truefortune or simply true-fortune casino, the offering caters to anyone wanting a polished and safe British-facing experience.
When it comes to game catalogue, this operator offers an impressively deep selection — think 4,000+ games. Leading providers such as Pragmatic Play, Big Time Gaming and Betsoft power the reels, which means high-RTP slots, bonus-buy features alongside old-school fruit machines. Payouts on many titles often reach life-changing sums, and that keeps the thrill alive.
The real-time section is a genuine strength. Driven by Evolution and Pragmatic Play Live, UK members can sit down at live roulette, blackjack and baccarat around the clock. Real dealers deal in real time live on camera, and popular entertainment titles of the game-show variety round out the lobby. It’s as close to a real casino as online play gets.
When it comes to bonuses, true fortune casino keeps things generous. First-timers are welcomed by a welcome package worth ?1,000 plus 100 free spins, topped up by a no deposit bonus to start with. Loyalty perks and reloads and a rewards ladder keep existing players busy, though it’s always worth checking the playthrough terms on each promo. Players can find out more on true fortune casino no deposit promo codes for existing players whenever you like.
On practicalities, the site accepts plenty of payment methods — debit cards, e-wallets like Neteller, alongside cryptocurrency. Registration takes quick and painless, with a modest minimum deposit around ?10, and withdrawals land quickly.
To wrap up, true fortune casino rounds things off with 24/7 customer support, a responsive mobile app for iOS and Android, and proper regulation and SSL encryption. For British punters looking for a trustworthy, feature-rich site, it’s a strong contender.
First impressions: the true casino brand known as true fortune is an increasingly popular online casino that has rapidly built a reputation across the UK. Anchored by its flagship platform at true-fortune.com, the brand aims to be a full-service home for slots, tables and live gaming. Whether you call it truefortune or true-fortune casino, the experience is tailored for those chasing a sleek, trustworthy GB-oriented platform.
When it comes to game library, the site serves up a seriously large selection — expect over 5,000 games. Leading providers like NetEnt, Microgaming and Yggdrasil sit behind the reels, which means high-RTP slots, progressive jackpots plus classic favourites. Payouts on many titles routinely stretch to life-changing sums, helping keep the thrill alive.
The live casino is another draw here. Streamed via Evolution Gaming, UK members can join authentic dealer tables 24/7. Human croupiers host every table from professional studios, with fun entertainment titles like Crazy Time and Lightning Roulette complete the experience. It’s about as authentic as online play gets.
Bonuses and offers, the site is genuinely competitive. First-timers are welcomed by a welcome package worth ?1,500 across your first deposits, topped up by a free spins deal for new accounts. Reload deals, weekly cashback and a rewards ladder keep existing players busy, though it’s always worth reviewing the wagering requirements on each promo. Players can find out more over at true fortune $25 free spins no deposit usa for the freshest deals.
When it’s time to bank, true fortune casino supports plenty of ways to pay — debit cards, Paysafecard and e-wallets, plus crypto options like Bitcoin. Registration takes just a couple of minutes, with a modest entry point near ?20, and payouts land quickly.
In summary, true fortune casino is supported by round-the-clock help via live chat and email, a slick mobile app for iOS and Android, and proper licensing and security. For UK players after a trustworthy, feature-rich home, it’s firmly on the shortlist.
صراحة أنا بقالي شوية أشهر بلعب على المنصة دي من الموبايل، وفكرت أقولكم اللي شفته علشان كتير من الشباب بيسألوا عن موضوع تطبيق 888starz. أكتر حاجة حبيتها إن عدد الألعاب رهيب، بيتكلموا عن أكتر من 2500 لعبة سلوتس تقريبًا، ومش كلها حشو زي بعض المواقع التانية.
اللي بيوفروا الألعاب كلها بروڤايدرز كبار زي Pragmatic Play وNetEnt. أنا مدمن Gates of Olympus وSweet Bonanza، ومن وقت للتاني بجرب Book of Dead. لو مش من هواة السلوتس فيه قسم الديلر المباشر من Evolution بناس بلحمها ودمها، وألعاب زي Crazy Time بتحسسك إنك في كازينو حقيقي.
موضوع العرض الترحيبي كويس: الديبوزيت الأول بياخد مية بالمية زيادة ومعاه لفات مجانية، وفيه no deposit لو بتحب تجرب الأول. بس خليك واخد بالك من شرط المراهنة اللي حوالي 40 ضعف — دي حاجة كتير بينسوها. لو عايز تعرف تفاصيل التنزيل شوفها عند 888starz apk وانت مطمن.
اللي مريّحني إن طرق الدفع كتير: كروت بنكية، ومحافظ زي Skrill وNeteller، وكمان عملات رقمية زي البيتكوين. الـwithdrawal بيجيلي بسرعة معقولة، مش زي مواقع بتماطل أسبوع. التسجيل نفسه بياخد دقايق، والحد الأدنى للإيداع صغير.
النقطة الوحيدة اللي زعلتني إن الدعم أحيانًا بيرد ببطء، ومرة استنيت شوية على الشات. غير كده تنزيل التطبيق على الأندرويد بيطلب إعدادات يدوية شوية، مش صعبة بس تحتاج انتباه. 888starz apk شغال حلو على الموبايل وبيجيله تحديثات باستمرار.
https://bs02.at
First impressions: the true casino brand known as true fortune is a well-rounded online casino that has rapidly built a reputation among UK players. Operating from its main hub at true-fortune.com, the site markets itself as a one-stop home for casino entertainment. Some players know it as truefortune or even true-fortune casino, the overall package caters to those chasing a sleek, trustworthy UK-friendly environment.
On the game catalogue, the site delivers a genuinely huge selection — somewhere in the region of over 5,000 slots and tables. Top-tier developers such as NetEnt, Microgaming and Yggdrasil supply the catalogue, delivering strong RTP percentages, bonus-buy features alongside old-school fruit machines. Payouts on many titles routinely climb into six figures, helping keep the thrill alive.
Live dealer play is another highlight. Powered by industry leaders like Evolution, you can join live roulette, blackjack and baccarat at any hour. Trained hosts host every table from purpose-built studios, and popular game shows such as Monopoly Live complete the experience. The result is about as authentic as it comes.
Bonuses and offers, the site keeps things generous. New players can claim a welcome package worth ?1,500 across your first deposits, topped up by a no deposit bonus for new accounts. Cashback, reload offers and a rewards ladder add ongoing value, remember to checking the playthrough terms before you claim. You can check the latest offers over at 100 free spins promo codes for true fortune casino, updated regularly.
When it’s time to bank, the cashier supports all the usual ways to pay — Visa and Mastercard, Paysafecard and e-wallets, alongside cryptocurrency. Registration takes quick and painless, with a low minimum deposit of about ?10, and withdrawals are handled fast.
In summary, the true casino backs it all up with 24/7 customer support, a slick mobile app for iOS and Android, and proper player-safety measures. For UK players who want a modern, generous casino, true fortune is a strong contender.
والله أنا بقالي حوالي أربع شهور بلعب على المنصة دي من الموبايل، وقررت أكتب تجربتي علشان كتير من الشباب بيسألوا عن موضوع تطبيق 888starz. أكتر حاجة حبيتها إن عدد الألعاب رهيب، قريب من تلت آلاف لعبة سلوتس تقريبًا، ومش كلها حشو زي بعض المواقع التانية.
اللي بيوفروا الألعاب ناس محترمين زي Pragmatic وPlay’n GO وBetsoft. أنا بلعب كتير على Gates of Olympus وSweet Bonanza، وبحب كمان Book of Dead. لو بتفضل اللعب الحقيقي فيه قسم اللايف من Evolution بموزعين حقيقيين، وشوز زي كريزي تايم بتحسسك إنك في كازينو حقيقي.
العروض للاعبين الجداد محترم صراحة: أول إيداع بياخد مضاعفة 100% زائد سبينات ببلاش، وفيه no deposit لو بتحب تجرب الأول. بس انتبه لحتة من متطلبات الرهان اللي حوالي أربعين مرة — دي نقطة لازم تفهمها. لو عايز تتطلع على آخر العروض شوفها عند 888starz apk وانت مطمن.
حاجة عجبتني إن طرق الدفع كتير: فيزا وماستركارد، وe-wallets، وكمان Bitcoin. السحب بيجيلي بسرعة معقولة، مقارنة بحاجات تانية سحبت منها. التسجيل نفسه بياخد دقايق، والحد الأدنى للإيداع مش مبالغ فيه.
النقطة الوحيدة اللي زعلتني إن خدمة العملاء أحيانًا بيرد ببطء، ومرة استنيت شوية على الشات. غير كده تثبيت البرنامج محتاج تسمح بمصادر خارجية، مش صعبة بس تحتاج انتباه. الأبليكيشن سلس على الموبايل والتحديث بيظبط المشاكل أول بأول.
في العموم أنا كمّلت عليه أكتر مما توقعت، و888starz apk بقى أساسي على موبايلي. فيه ليسنس معلن على الموقع، وده حاجة مهمة وانت بتحط فلوسك. لو عندك سؤال اسأل.
kasina za ceske koruny
Играю на 888starz где-то полгода, поэтому делюсь без прикрас. Зашёл случайно, особо не ждал ничего, но в итоге залип. Регистрация заняла минуты три — пару полей и всё, доки потом уже при выводе. Минималка копеечный, начинал с пары долларов, чтобы осмотреться.
Насчёт слотов тут реально жирно — заявлено за пару тысяч тайтлов. Софт которым доверяешь: Pragmatic Play, NetEnt, Play’n GO, ещё Yggdrasil и Betsoft. Из любимого Gates of Olympus и Sweet Bonanza, под настроение заглядываю в Book of Dead. Отдельно отмечу стол с дилерами от Evolution — реальные крупье, Crazy Time затягивает, хотя по деньгам казна казино не дремлет.
Насчёт приветственного адекватно: накидывают до 100% на депозит и ещё около 150 фриспинов. Условия отыгрыша как везде х40, поэтому считайте заранее — сам пролетел с этим по глупости. К слову свежие условия и рабочие бонусы удобнее сверять через 88 stars чтобы не пролететь, инфа не протухшая. Периодически прилетает бонус за регистрацию, но это ловите по акциям.
По кэшауту это самое важное, и тут без криминала. Платёжек хватает: Visa, Mastercard, кошельки, ну и крипта. Криптой быстрее всего, на карту иногда сутки. На днях заказал — деньги пришли за полчаса. Что бесит — под выходные могут придраться к докам, терпимо.
Мобилка радует: есть apk под андроид, на айфон через профиль без танцев с бубном. Установить можно с офсайта, если лень качать работает шустро. Поддержка в чате 24/7, по-русски без ботов-тупиков. Лицензия Кюрасао — не оффшор без бумаг. Короче пока не ушёл, 888starz свою нишу занял, но идеала нет.
Signed up and been playing at true fortune casino for a while now, and honestly it’s grown on me. Playing from the UK so what mattered to me was whether GBP and the usual cards worked, and that side of things has been fine.
Game-wise there’s honestly massive, I’d guess around 2,000 titles if not more. Loads from the big names — Pragmatic Play, NetEnt, Play’n GO, Yggdrasil and Big Time Gaming represented. My go-to slots are Sweet Bonanza and Book of Dead, but the search could be better. If you’re into live stuff, the tables run on Evolution — real croupiers, blackjack, roulette and Crazy Time and the other game shows if that’s your thing.
On the bonus side, the sign-up package was nothing crazy but fair — a deposit match plus a chunk of free spins. Just read the wagering first, I think it was 35x which is standard-ish but adds up. Existing players get reload codes as well, so it’s worth a see what’s live at true fortune casino home rather than taking the first thing you see. Min deposit is low, think it was a tenner, so you’re not risking much to try it out.
Cashouts are honestly the real test. Payments-wise I stick to Skrill and the odd card deposit, there’s also e-wallets and Bitcoin. My e-wallet payouts landed in about 48 hours, but there’s the usual pending period. The one thing that annoyed me — verification took a couple of goes before it went through.
Runs fine on mobile — no separate app but you don’t really need one, plays smooth on the iPhone. The support team were okay when I pinged them, answered within a few minutes. It’s licensed, which is the main thing for me. Not perfect, but for a casual few spins it does the job.
يعني أنا بقالي شوية أشهر بلعب على المنصة دي من الموبايل، وقررت أكتب تجربتي علشان كتير من الشباب بيسألوا عن موضوع تطبيق 888starz. أكتر حاجة حبيتها إن عدد الألعاب رهيب، قريب من أكتر من 2500 لعبة سلوتس تقريبًا، ومش كلها حشو زي بعض المواقع التانية.
اللي بيوفروا الألعاب كلها بروڤايدرز كبار زي Pragmatic Play وNetEnt. أنا مدمن سويت بونانزا وجيتس أوف أوليمبوس، وأحيانًا بلف على Book of Dead. لو بتفضل اللعب الحقيقي فيه قسم الكازينو الحي من Evolution بكروبيهات حقيقيين، وشوز زي كريزي تايم بتحسسك إنك في كازينو حقيقي.
موضوع العرض الترحيبي كويس: أول شحن بياخد مية بالمية زيادة مع فري سبينز، وفيه حاجة بسيطة من غير ما تشحن لو بتحب تجرب الأول. بس انتبه لحتة من الـwagering اللي حوالي x40 — دي حاجة كتير بينسوها. لو عايز تشوف الأكواد الحالية ادخل على تحميل 888 علطول.
اللي مريّحني إن خيارات السحب والإيداع متنوعة: كروت بنكية، وسكريل ونتلر، وكمان عملات رقمية زي البيتكوين. طلب الفلوس بيجيلي بسرعة معقولة، مش زي مواقع بتماطل أسبوع. التسجيل نفسه بياخد دقايق، والحد الأدنى للإيداع مش مبالغ فيه.
النقطة الوحيدة اللي زعلتني إن الدعم أحيانًا بيرد ببطء، ومرة قعدت مستني رد. غير كده تحميل التطبيق للأندرويد محتاج تسمح بمصادر خارجية، حاجة عادية بس مبتدئ ممكن يلخبط. التطبيق نفسه خفيف على الموبايل والتحديث بيظبط المشاكل أول بأول.
بالنسبة لي كلاعب مصري أنا مبسوط أكتر مما توقعت، و888starz apk بقى أساسي على موبايلي. فيه ليسنس معلن على الموقع، وده بيدي طمأنينة وانت بتحط فلوسك. لو عندك سؤال اسأل.
بصراحة أنا بقالي فترة مش قليلة بلعب على المنصة دي من الموبايل، وحبيت أشارككم رأيي علشان في ناس بتتخبط عن موضوع 888starz app. أول حاجة لفتت نظري إن المكتبة كبيرة جدًا، قريب من تلت آلاف لعبة سلوتس تقريبًا، ومش كلها حشو زي بعض المواقع التانية.
مطوري الألعاب ناس محترمين زي Pragmatic Play وNetEnt. أنا بحب Gates of Olympus وSweet Bonanza، وأحيانًا بلف على Book of Dead. لو بتفضل اللعب الحقيقي فيه قسم اللايف من Evolution بكروبيهات حقيقيين، وCrazy Time وروليت مباشر ممتعة فعلًا.
بالنسبة للبونص محترم صراحة: أول إيداع بياخد مية بالمية زيادة زائد سبينات ببلاش، وفيه عرض بدون إيداع لو بتحب تجرب الأول. بس اقرا الشروط كويس من الـwagering اللي حوالي x40 — دي مش حاجة تعديها. لو عايز تعرف تفاصيل التنزيل روح لـ برنامج 888 قبل ما تسجّل.
حاجة عجبتني إن خيارات السحب والإيداع متنوعة: Visa وMasterCard، ومحافظ زي Skrill وNeteller، وكمان Bitcoin. طلب الفلوس بياخد يوم لتلاتة على المحفظة، مش زي مواقع بتماطل أسبوع. التسجيل نفسه سهل وسريع، والحد الأدنى للإيداع صغير.
عيب لازم أقوله إن السابورت مش دايمًا سريع الرد، ومرة استنيت شوية على الشات. غير كده تحميل التطبيق للأندرويد بيطلب إعدادات يدوية شوية، مش صعبة بس تحتاج انتباه. الأبليكيشن سلس على الموبايل وبيجيله تحديثات باستمرار.
في العموم أنا كمّلت عليه أكتر مما توقعت، و888starz apk هو اللي بلعب عليه أغلب الوقت. فيه ليسنس معلن على الموقع، وده بيدي طمأنينة وانت بتحط فلوسك. لو حد جرّبه يشاركنا.
والله أنا بقالي حوالي أربع شهور بلعب على المنصة دي من الموبايل، وقررت أكتب تجربتي علشان ناس كتير هنا في مصر بتسأل عن موضوع تطبيق 888starz. أول حاجة لفتت نظري إن فيه كم ألعاب ضخم، بيتكلموا عن 3000 لعبة سلوتس تقريبًا، ومش كلها حشو زي بعض المواقع التانية.
مطوري الألعاب ناس محترمين زي براجماتيك وبلاي إن جو. أنا بلعب كتير على سويت بونانزا وجيتس أوف أوليمبوس، وأحيانًا بلف على Book of Dead. لو بتفضل اللعب الحقيقي فيه قسم اللايف من Evolution بكروبيهات حقيقيين، وشوز زي كريزي تايم بتحسسك إنك في كازينو حقيقي.
موضوع العرض الترحيبي مش وحش أبدًا: أول شحن بياخد مضاعفة 100% ومعاه لفات مجانية، وفيه عرض بدون إيداع لو بتحب تجرب الأول. بس اقرا الشروط كويس من شرط المراهنة اللي حوالي 40 ضعف — دي نقطة لازم تفهمها. لو عايز تعرف تفاصيل التنزيل روح لـ برنامج مراهنات 888starz وانت مطمن.
اللي مريّحني إن طرق الدفع كتير: فيزا وماستركارد، وسكريل ونتلر، وكمان كريبتو وبيتكوين. الـwithdrawal بيجيلي بسرعة معقولة، مش زي مواقع بتماطل أسبوع. التسجيل نفسه مش معقد، والحد الأدنى للإيداع مش مبالغ فيه.
اللي مضايقني شوية إن الدعم مش دايمًا سريع الرد، ومرة استنيت شوية على الشات. غير كده تثبيت البرنامج محتاج تسمح بمصادر خارجية، حاجة عادية بس مبتدئ ممكن يلخبط. الأبليكيشن سلس على الموبايل وبيجيله تحديثات باستمرار.
في العموم أنا مبسوط أكتر مما توقعت، والتطبيق هو اللي بلعب عليه أغلب الوقت. الترخيص موجود ومعلن، وده حاجة مهمة وانت بتحط فلوسك. لو حد جرّبه يشاركنا.
https://m-blsp.art
kasina za ceske koruny
Кручу барабаны на 888starz с зимы, так что делюсь без прикрас. Зашёл по совету знакомого, думал очередная помойка, но остался. Регистрация быстрая, без нервов — пару полей и всё, доки потом уже при выводе. Минималка смешной, начинал с пары долларов, чтобы проверить.
С играми тут глаза разбегаются — где-то около 3000 позиций. Провайдеры все топовые: Pragmatic Play, NetEnt, Play’n GO, ещё Yggdrasil и Betsoft. Залипаю на Gates of Olympus плюс Sweet Bonanza, иногда захожу в Book of Dead. Что порадовало стол с дилерами от Evolution — настоящие столы, их game show бывает разносит банк, хотя на дистанции это лотерея.
Насчёт приветственного всё стандартно, но щедро: стартовый бонус на первый деп и ещё фриспины. Условия отыгрыша как везде х40, поэтому не ведитесь слепо — я по первости не вкурил и подарок сгорел. Кстати свежие условия и рабочие бонусы удобнее посмотреть на 888 stars перед регой, там всё обновляют. Периодически прилетает бонус за регистрацию, но это ловите по акциям.
По кэшауту для меня главное, и тут претензий нет. Платёжек хватает: Visa, Mastercard, электронки, ну и USDT. Криптой быстрее всего, карты дольше. На днях снимал — дошло без волокиты. Единственное что напрягает — иногда тянут с проверкой, разово было.
Приложение отдельная тема: есть apk под андроид, на айфон через профиль без танцев с бубном. Скачать реально прямо с сайта, в браузере без лагов. Саппорт на связи быстро, на русском отвечают живые люди. По документам легально по Curacao — доверия добавляет. Короче пока не ушёл, 888starz свою нишу занял, хотя идеала нет.
Стальная лента — надёжный упаковочный материал для обвязки грузов, и купить её выгодно можно напрямую со склада в России.
ЭИ814 характеристики https://splavopedia.ru/ei814-17khngt/
https://gidromashin.com/product-category/zapchasti-k-gidronasosam/page/14/
https://n-blsp.at
Знакомства Луганск
Как топ seo продвижение учитывает конкурентную среду клиента?
создать музыку ии Умная нейросеть может сгенерировать песню по вашему текстовому описанию или готовым стихам. Получите трек с профессиональным звучанием и чистым вокалом моментально.
https://rekaoblaka.ru/
https://lbs2best.at
https://tribunenantaise.fr/actus-fcnantes/bookmaker-hors-arjel-comparatif-2026-et-meilleures-alternatives-legales/
продвижение сайтов продвижение сайтов
https://bs2beet.at
продвижение телеграм каналов чатов продвижение телеграм каналов чатов
продвижение сайта в яндекс продвижение сайта в яндекс
выкуп авто на разбор
https://bs02.at
https://blender.community/reyeslohmann/
https://gamelet.online/user/1xbetpromo2027
https://mforum.cari.com.my/home.php?mod=space&uid=3418154&do=profile
создание песни ии бесплатно Популярная нейросеть песен предлагает интуитивно понятное управление и потрясающее качество конечного результата. Начните свое музыкальное путешествие прямо сейчас.
https://www.oscarbookmarks.win/monthly-promo-code
девушки Луганск
https://dq10wiki.net/wiki/?toto1xbetpromo
https://devpost.com/roryrason
https://www.blurb.com/user/1xbetfree0
https://pikidi.com/seller/profile/mclainmendoza5
https://redirect.camfrog.com/redirect/?url=https://joell.in/articles/1xbet_promo_code_free_bet_welcome_bonus.html
تحميل 888starz للاندرويد تحميل 888starz آخر إصدار
https://blender.community/simmonswinstead/
оздать песню онлайн Простая нейросеть поможет трек создать для любого творческого или коммерческого проекта. Получите готовое музыкальное сопровождение за пару минут.
https://holckgroth17.bravejournal.net/online-betting-promo-code-unlock-welcome-bonus-deals-free-bets-plus
https://www.apu-bookmarks.win/guaranteed-bonus-code
http://app.gxbs.net/home.php?mod=space&uid=2043683
https://twitback.com/post/338947
девушки Донецк ТГ
продвижение телеграм каналов чатов продвижение телеграм каналов чатов
продвижение сайта в яндекс продвижение сайта в яндекс
выкуп авто на запчасти
https://www.rossoneriblog.com/author/rorymuntz2026/
https://rdcvw.com/?462022
https://biiut.com/post/116146_everything-about-registration-eshttps-flyinghighforkids-com-art-888starz-promo-h.html
https://3dwarehouse.sketchup.com/by/roryrason
https://www.smallbizamerica.org/business-services/today-codepromo
https://кофе-принтер.рф/
https://pad.libreon.fr/s/VJWJo-z4D
https://www.peopletrainers.in/profile/ethanscrivener2629207/profile
калькулятор обоев онлайн Автоматический расчет зарплаты бригад в CRM учитывает сдельную оплату труда и проценты от выполненных этапов. Четкий учет закупа материалов на объект позволяет вовремя доставлять сырье без простоев в работе.
ко ланта ко ланта
https://кофе-принтер.рф/
https://xn—-itbblhvdkjdur.xn--p1ai/
https://editor.telescope.ac/blogs/xbet-promo-code/irubbnawxryl8uxb9pgeq6
расчет пескобетона на стяжку пола Вопрос о том, сколько стоит поклейка обоев за м2, волнует каждого, кто планирует бюджетный косметический ремонт. Профессиональная цена укладки плитки за м2 формируется с учетом формата кафеля и сложности узора.
экскурсии на ко ланте Краби — это удивительная провинция Таиланда, которая сочетает в себе величественные скалы, лазурные воды моря и богатую культуру. Этот регион идеально подходит как для любителей активного приключения, так и для ценителей неспешного отдыха.
https://robosila.com/
https://gidromashin.com/
https://kwork.ru/user/irinamoskow
https://candysamy.com
ко ланта ко ланта
сколько стоит поклейка обоев за м2 Специализированная CRM для строительной компании помогает автоматизировать все этапы от первого звонка клиента до сдачи объекта. Современная CRM система для ремонта квартир позволяет эффективно контролировать сроки, закупки и взаиморасчеты с бригадами.
https://robosila.com/
ао нанг ко ланта Ко Ланта славится своим гостеприимством и доступными ценами на качественный отдых. Здесь можно найти баланс между доступностью и высоким уровнем сервиса в отелях.
ко ланта ко ланта
https://robosila.com/
ко ланта пляжи Ко Ланта — это живописный остров в Таиланде, который идеально подходит для спокойного и уединенного отдыха. Здесь можно насладиться нетронутой природой и тишиной, вдали от шумных туристических центров.
https://gidromashin.com/product-category/zapchasti-k-gidronasosam/page/14/
смета на капитальный ремонт квартиры Официальный индекс цен на строительные работы отражает общую инфляцию на рынке строительных материалов. Ощутимый рост цен на ремонт квартир 2026 года подстегивает интерес к автоматизации процессов.
https://robosila.com/
ко ланта ко ланта