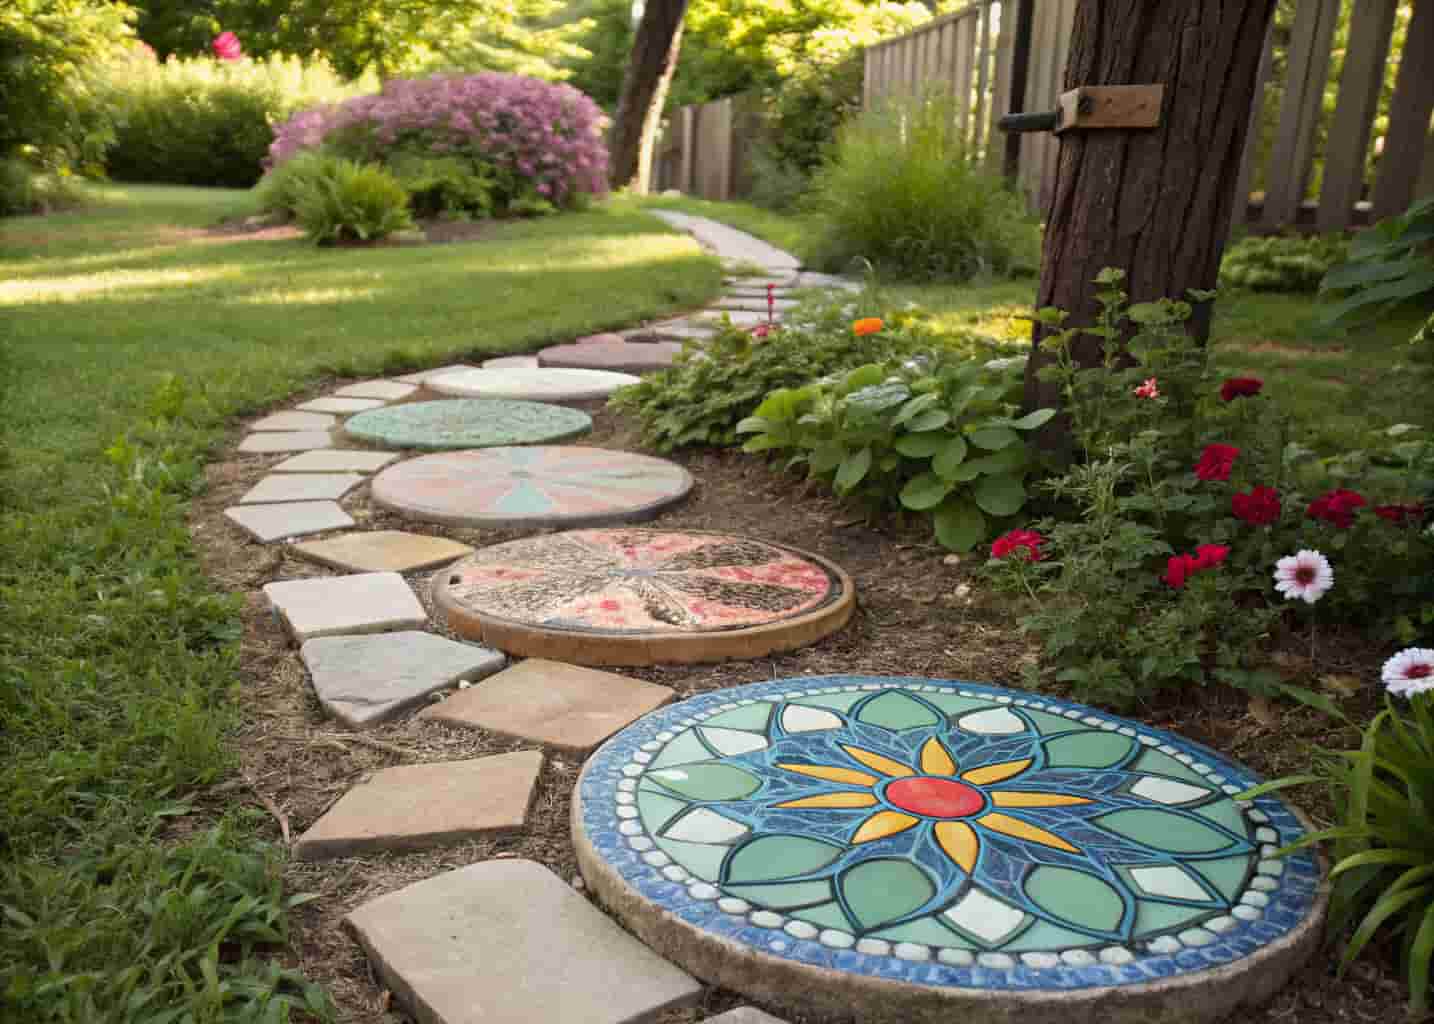
Have you ever looked at your backyard and thought it needed something — not a big renovation, just a little something that makes it feel more you? That’s exactly how I felt last spring. I had a plain concrete path leading to my garden, and every time I walked on it, I felt like something was missing. Then I stumbled onto mosaic stepping stones, and honestly, my whole weekend was gone. In the best possible way. These little beauties are easier to make than you think, they cost almost nothing, and when you place them in your garden, they look like you hired someone fancy. Whether you’re a total beginner or you’ve done some crafting before, this guide walks you through 13 ideas that are genuinely fun to try — even with kids.
What You’ll Need Before You Start
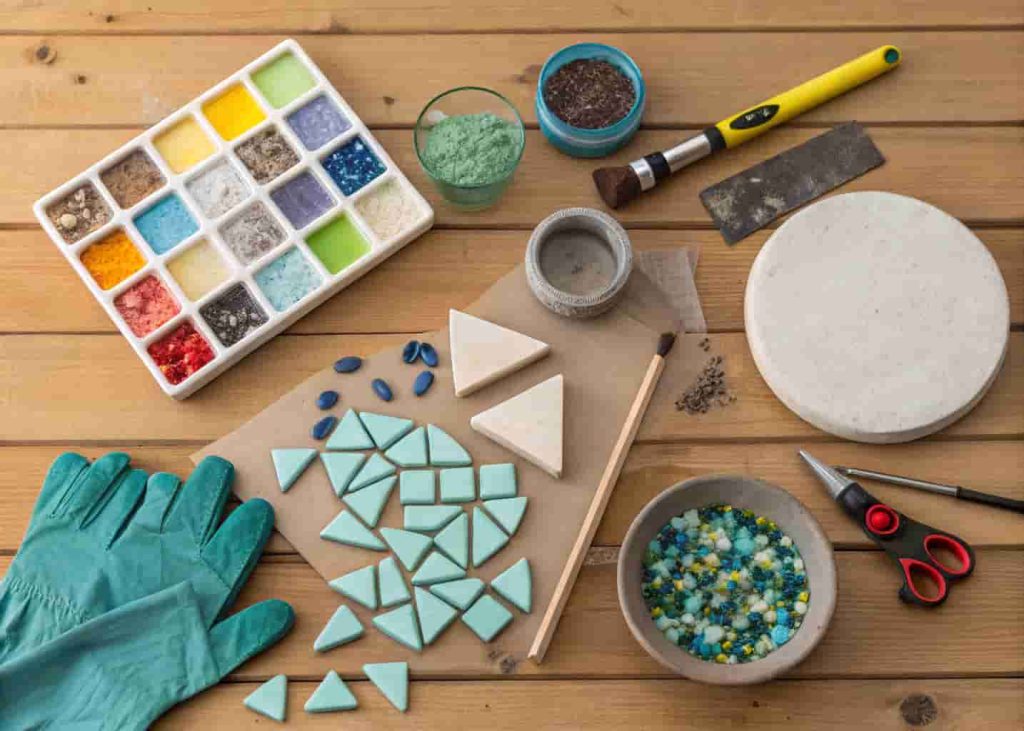
Before we jump into the ideas, let’s talk supplies. You don’t need a fancy craft store haul. Most of this stuff you probably already have or can grab cheaply. You’ll need concrete mix or premade stepping stone molds, which are available at most hardware stores for just a few dollars. Then comes the fun part — your mosaic materials. Broken tiles, old dishes, glass gems, river rocks, sea glass, and even broken mirror pieces all work beautifully. You’ll also want tile adhesive or mortar, grout, a rubber mallet, gloves, and some old towels for cleanup. A mold can be as simple as a plastic lid, a cake pan, or a purchased form. The whole setup shouldn’t cost you more than $10 to $20 per stone if you’re resourceful. Garage sales and thrift stores are gold mines for old ceramic dishes you can smash and use.
How the Basic Process Works
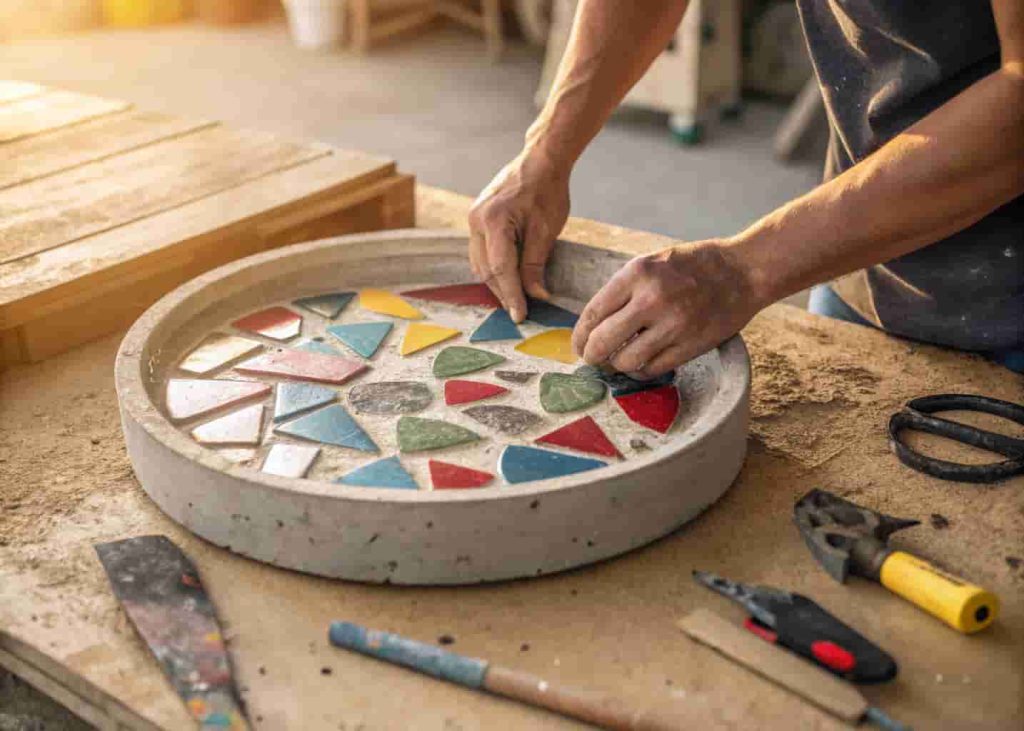
Making a mosaic stepping stone is a three-step process, and none of the steps are complicated. First, you mix and pour your concrete into a mold and let it set just enough to hold its shape — usually about 30 minutes depending on the mix. Then you press your mosaic pieces into the surface while the concrete is still soft and workable. Once everything is arranged the way you like it, you let it cure fully for 24 to 48 hours. After that, you apply grout between the pieces, wipe off the excess, and you’re done. The grout fills in all the gaps and gives your stone that polished, finished look. Some people skip the grout step, but it really does make a huge difference in how professional the final piece looks. It also helps seal everything in and makes the stone more durable outdoors.
Broken Plate Mosaic Stepping Stone
This is probably the most classic mosaic look, and it never gets old. Grab a few old ceramic plates — thrift stores often have them for 25 cents each — wrap them in a towel, and gently break them with a hammer. What you get are these gorgeous irregular pieces with curved edges that fit together almost like a puzzle. The best part is that old plates often have beautiful patterns on them, so your stepping stone ends up with this patchwork of colors and designs that looks really intentional and artistic. Press the pieces into your concrete with the patterned side facing up. Don’t worry about making it perfect — the imperfections are literally what make it beautiful. I made one using my grandmother’s old mismatched china, and now I smile every time I walk past it in the garden.
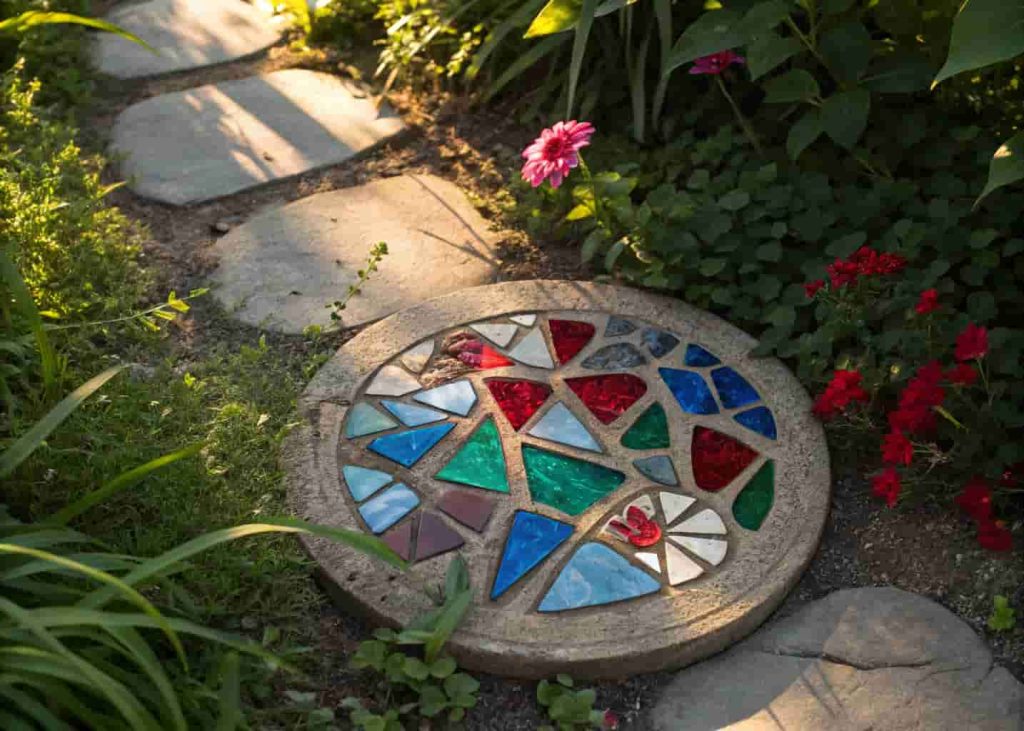
Stained Glass Stepping Stone
If you want something that genuinely stops people in their tracks, this is the one. Stained glass pieces catch the light in a way that regular tiles just can’t. You can find scrap stained glass at craft stores, art supply shops, or even from stained glass hobbyists who give away offcuts. The colors pop beautifully — deep reds, cobalt blues, emerald greens. When the sun hits them at the right angle in the morning, it looks like tiny jewels are embedded in your path. The technique is exactly the same as the broken plate method, but since stained glass is thinner, you’ll want to press it in a little carefully so it doesn’t crack further. Use thicker pieces for the main design and smaller slivers to fill in gaps. The result is genuinely stunning for very little effort.
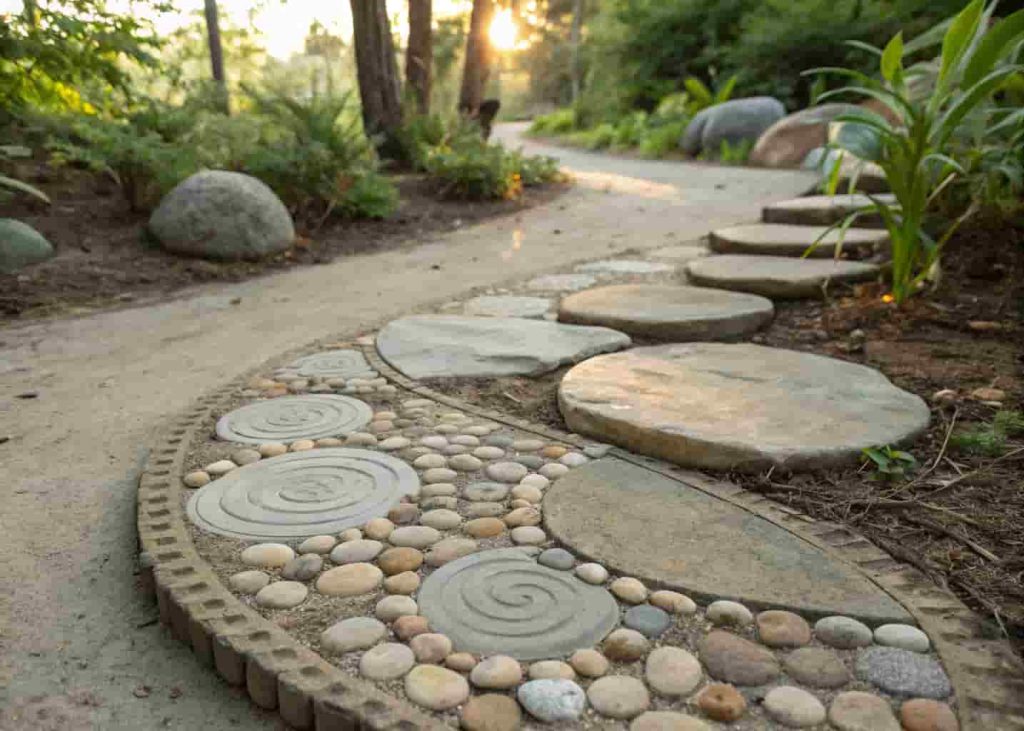
River Rock and Pebble Stepping Stone
This one has a very natural, zen-garden kind of vibe. Instead of breaking anything, you just collect smooth river rocks or buy a bag of decorative pebbles — both work perfectly. Press them into the concrete in a pattern, or just scatter them randomly for an organic look. You can stand them on their edges to get that traditional Japanese garden effect, or lay them flat for a smoother surface to walk on. Either way, it looks really elegant and fits into almost any garden style. The rocks also tend to be very durable, which makes these stepping stones extra long-lasting. I’ve seen people combine larger river rocks with smaller pea gravel to fill in the gaps, and the texture contrast looks amazing. It’s also a great project to do with kids because there’s no sharp broken glass or tile involved.
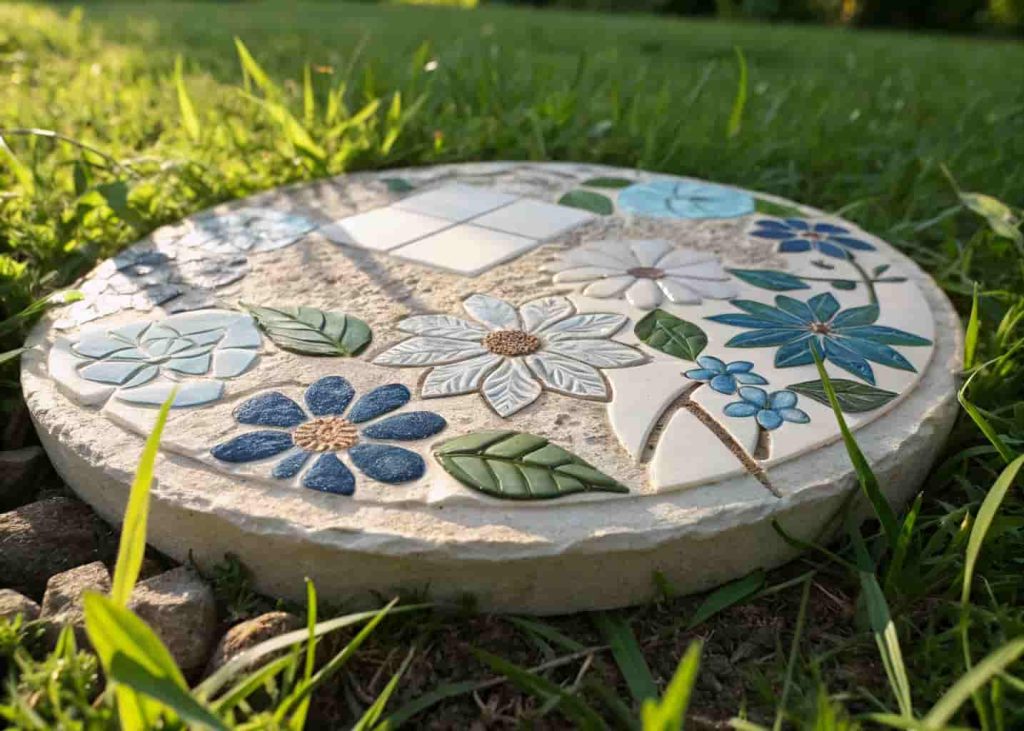
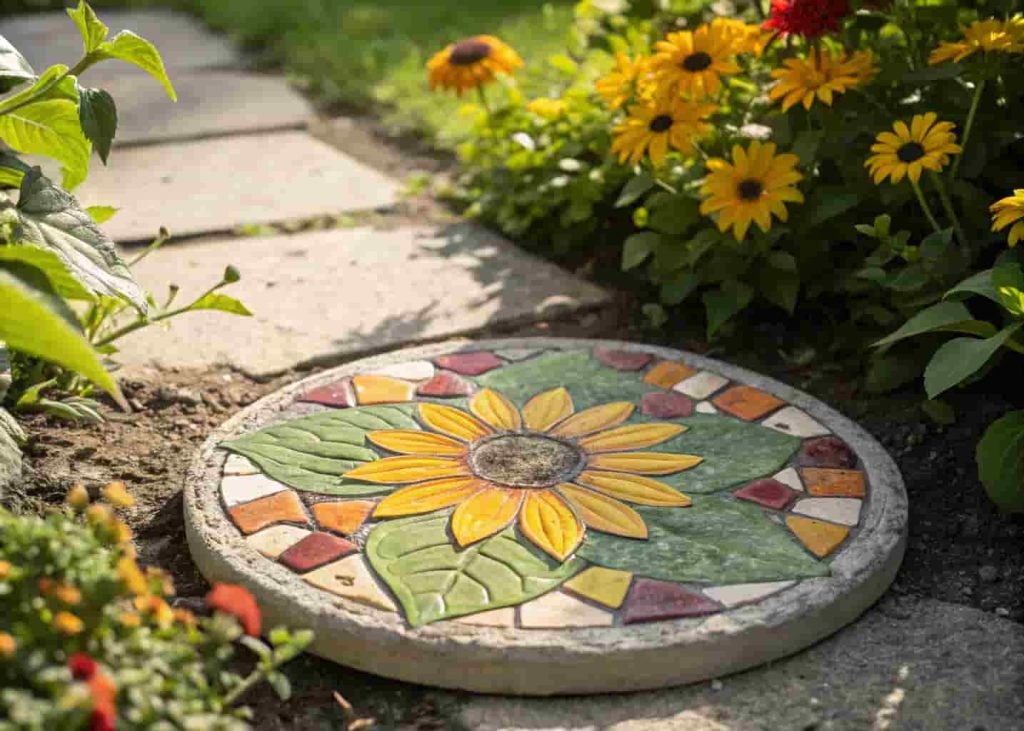
Floral Mosaic Stepping Stone
This is where you can really get creative and design something that looks like actual artwork. Plan out a simple flower shape — a sunflower, a daisy, a lotus — and use different colored tile pieces to build it out in the concrete. Yellow tiles for petals, a brown or orange center, green pieces for leaves. You don’t need to be a great artist. Just sketch it lightly on paper first, then copy the layout onto your concrete. Simple shapes work best because they translate clearly even after grouting. The finished stone ends up looking like a little painting permanently embedded in your yard. These make incredible gifts, by the way. I made a sunflower one for my neighbor’s birthday and she cried. They’re just that personal and thoughtful when you make them with someone specific in mind.
Recycled Glass Gem Stepping Stone
Glass gems — those flat-bottomed, dome-shaped decorative gems you find at dollar stores and craft shops — are absolutely perfect for this project. They’re cheap, they come in every color imaginable, and they press into concrete like they were made for it. You can create a simple random colorful design, or you can arrange them into patterns like a mandala, a star, or even spell out a word or initial. Because the gems are smooth and rounded on top, they’re comfortable to walk on and they don’t collect as much dirt as irregular tile edges do. Kids go absolutely crazy for this version because the gems look like buried treasure in the stone. A whole bag of glass gems costs about $3, so you can make multiple stones for practically nothing. These look especially great lining a path to a children’s play area or garden gate.
Initial or Name Stepping Stone
This one is personal, and that’s exactly what makes it special. You can use tile pieces, glass gems, or even glass mosaic tiles to spell out a letter, a name, or a short word in the concrete. “HOME,” a family initial, a child’s name by their garden plot — the possibilities are really sweet. The trick is to plan your letters on paper first and then carefully transfer the design. Using a contrasting background color makes the letters pop. For example, white letter tiles on a dark blue or black tile background looks really sharp and clean. These are incredibly popular as housewarming gifts or personalized garden decor. If you’re making them to give away, let the stone cure for the full 48 hours before moving it, otherwise you risk cracking it and ruining all that careful lettering work.

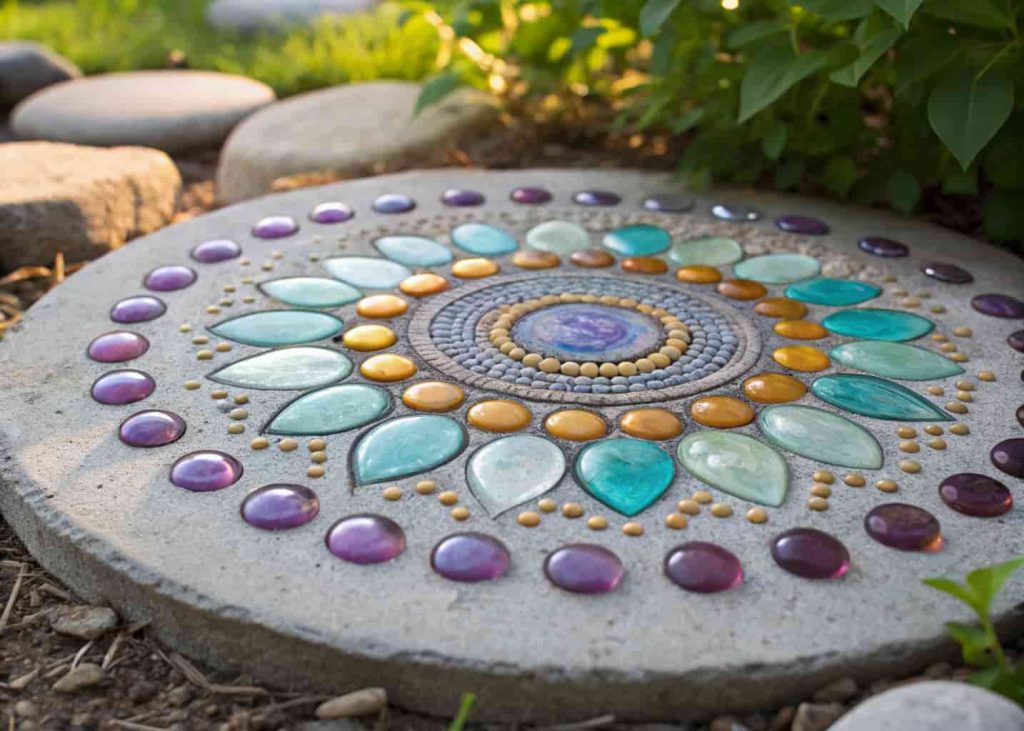
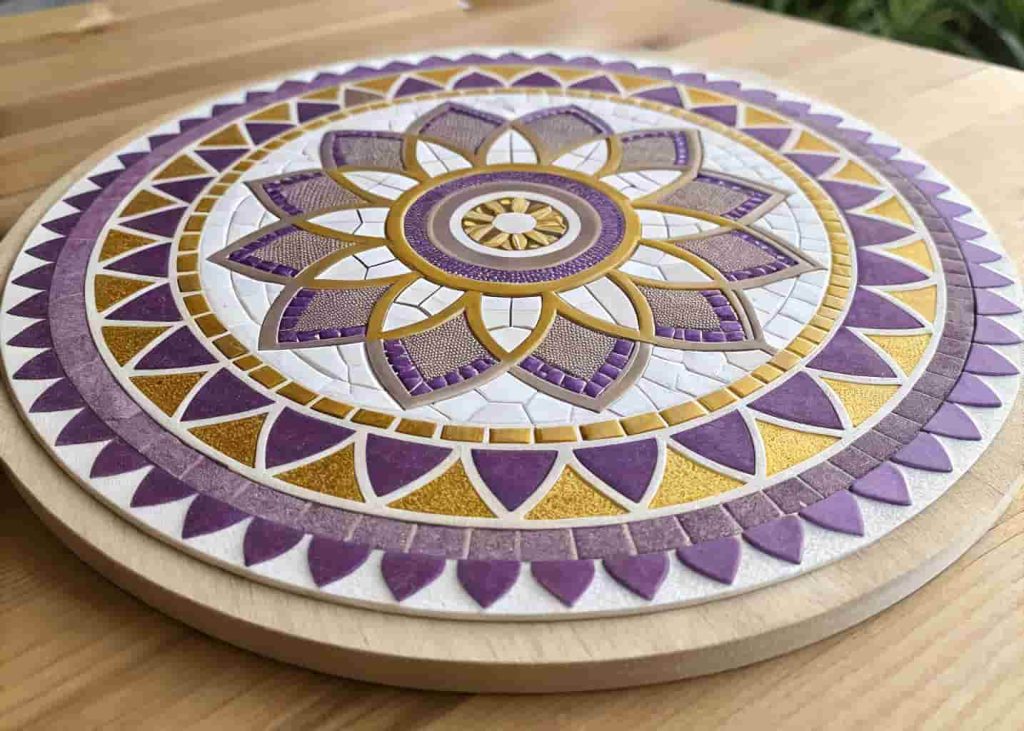
Mandala Mosaic Stepping Stone
Mandalas are circular patterns built from repeating shapes radiating out from a center point, and they translate absolutely beautifully into mosaic stepping stones. This one takes a little more planning, but it is so worth it. Start from the center with a single gem or decorative tile, then build rings of color and pattern outward. The key is symmetry — or at least the attempt at it, because even slightly imperfect mandalas look gorgeous. Use contrasting colors for each ring to make the pattern clear. Deep purple, gold, and white is a classic combo. Turquoise, coral, and ivory works too. You can find mandala templates online and print them out to use as a guide while you place your tiles. Once grouted, a mandala stepping stone honestly looks like something from a boutique home decor shop. People will always ask where you bought it.
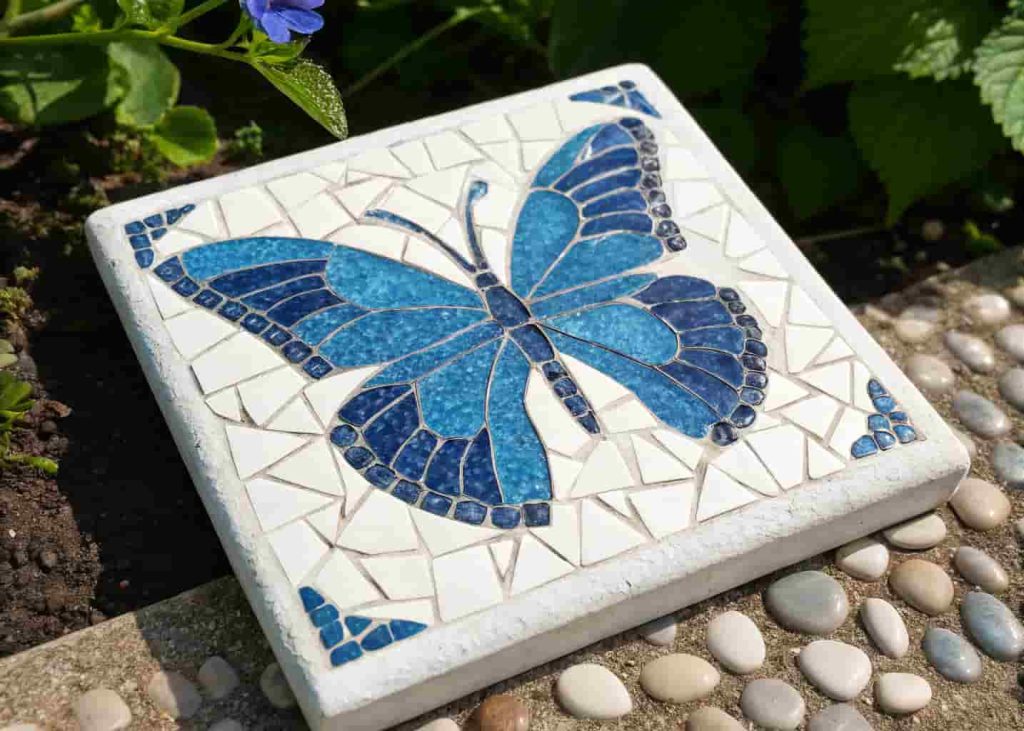
Butterfly or Bird Mosaic Stepping Stone
Animal and nature silhouettes make for some of the most eye-catching stepping stones you can create. A butterfly, a dragonfly, a hummingbird — these shapes are simple enough to execute but dramatic enough to really stand out in a garden. The secret is to use bold, high-contrast colors against a plain background. A bright blue butterfly against a white tile background looks absolutely stunning. Or try a red cardinal on a grey background for something a bit more subtle. You can find mosaic stencils or trace a simple shape from a printed image. Fill in the outline with one color of tile pieces, then fill the background with another. It sounds complicated, but once you start placing pieces it goes quickly and feels very satisfying. These work especially well placed near flower beds or birdbaths where they feel like part of the natural scene.
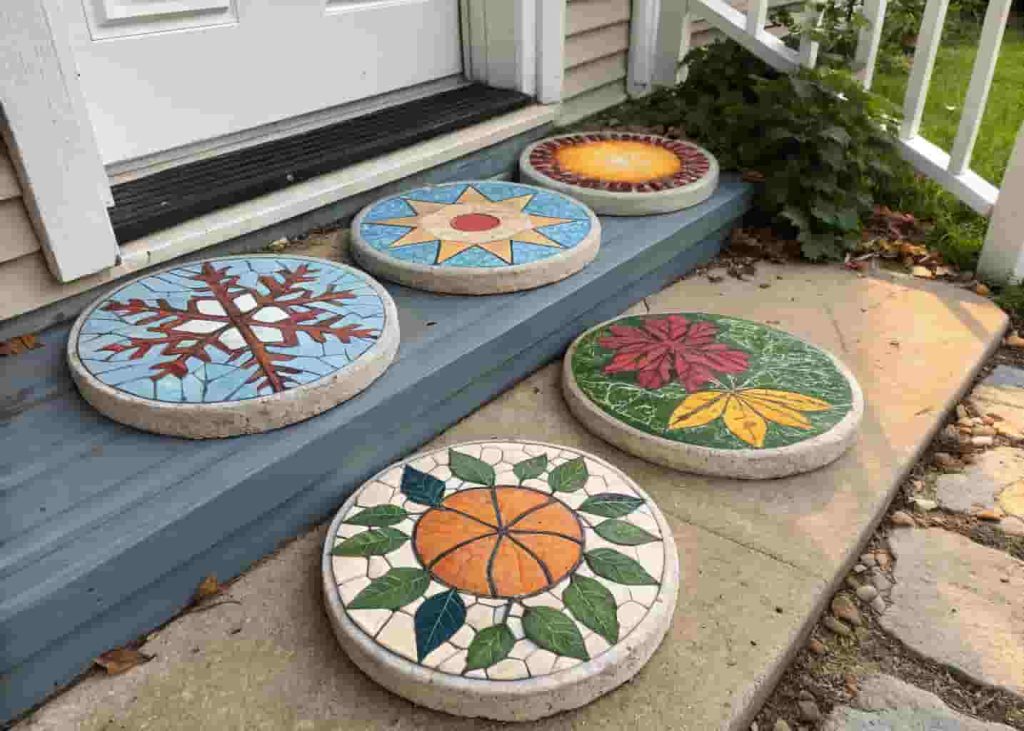
Seasonal or Holiday Themed Stepping Stone
Here’s a fun idea — make stepping stones that celebrate a season or holiday and swap them out through the year. A snowflake design for winter, a pumpkin for fall, a sun for summer, flowers for spring. You can even make a Christmas wreath or a heart for Valentine’s Day. Because the concrete is durable and weatherproof, they’ll hold up season after season as long as you store them properly when not in use. Making seasonal stones also becomes a fun annual tradition. My friend makes a new one every Christmas with her kids and lines them up on the porch path. They’ve got five years worth now and it’s become this sweet little record of every holiday season. Plus, when guests come over, it’s a great conversation starter and a really personal touch that no store-bought decoration can replicate.
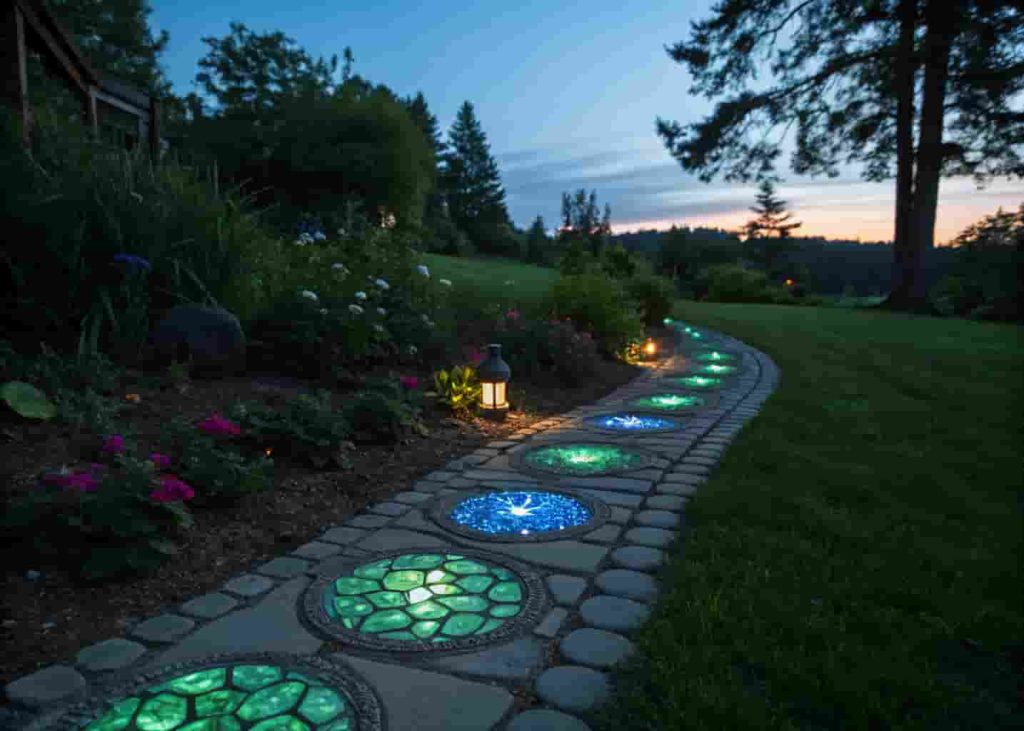
Glow-in-the-Dark Mosaic Stepping Stone
Okay, this one is genuinely cool and a little bit magical. You can buy glow-in-the-dark glass gems, tiles, or even glow powder to mix into your grout. During the day, these stones look like normal colorful mosaics. But at night or in the dark, they glow softly in green or blue. For a garden path, this is both beautiful and actually practical — it helps guide you at night without needing any electrical lighting. Kids absolutely love these, and they’re not much harder to make than a regular stepping stone. The glow-in-the-dark gems are widely available online and in craft stores. Some people mix them in with regular gems so the glow is subtle, others go full coverage for maximum effect. Either way, this is the kind of project that makes people stop and say “wait, did you actually make that?”
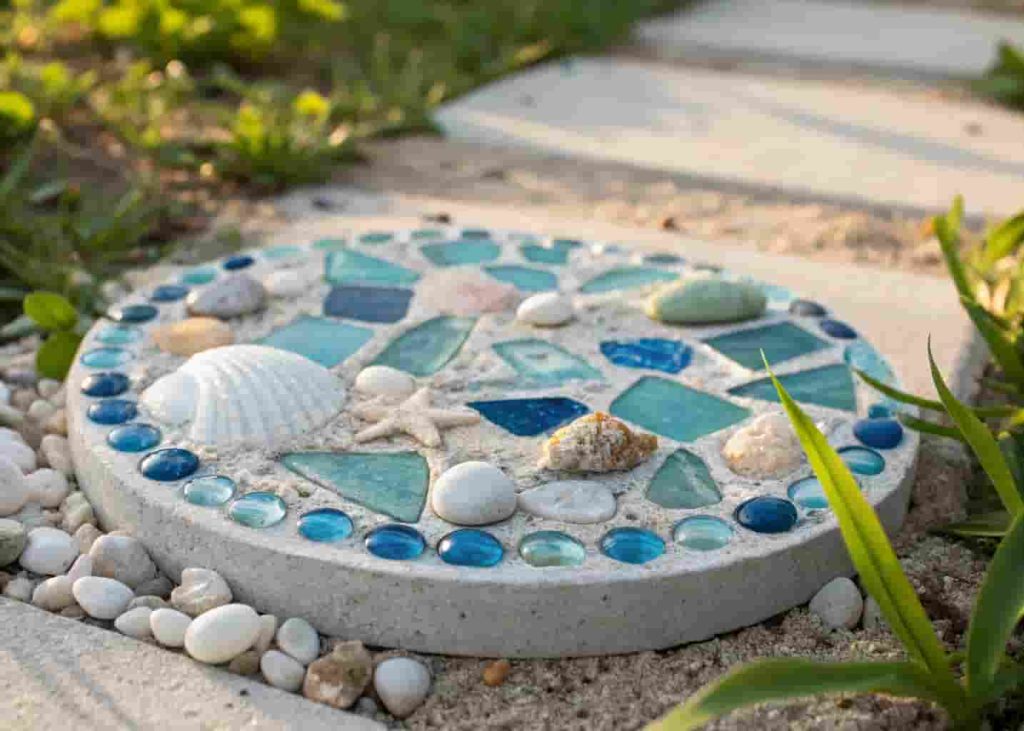
Mixed Media Stepping Stone
Who says you have to stick to one material? Some of the most interesting mosaic stepping stones mix several different elements together — tile pieces, glass gems, pebbles, shells, old jewelry, marbles, even hardware like old keys or buttons. The trick is to keep a consistent color palette so it doesn’t look random or messy, even though you’re using totally different materials. For example, you could do a coastal theme using sea glass, small shells, and blue glass gems all in a blue-and-white palette. Or a bohemian look with brass buttons, amber glass, old earrings, and terracotta tile pieces. I once pressed an old clock face into a stepping stone as the centerpiece and surrounded it with gold glass gems. It’s one of my favorite things I’ve ever made. Mixed media stones are also a great way to use up random crafting leftovers you have lying around.
Conclusion
Mosaic stepping stones are one of those rare DIY projects where the effort is low, the cost is minimal, and the result looks genuinely impressive. You don’t need any special skills, expensive tools, or a whole weekend of free time. A few hours, some cheap supplies, a little creativity, and you’ve got a piece of handmade art that’ll sit in your garden for years. Start with one simple design — maybe the river rock stone or the glass gem one — and see how you feel. Once you make your first one and put it in your garden, I promise you’ll want to make more. There’s something really satisfying about walking on something you made with your own hands. Your garden deserves that personal touch, and honestly, so do you.